Next.js Learn - 9. Streaming 번역

본 포스팅은 Next.js Learn의 Streaming 내용을 번역한 것입니다.
이전 장에서는 대시보드 페이지를 동적으로 만들었습니다. 그리고 느린 데이터 가져오기가 애플리케이션 성능에 어떤 영향을 미칠 수 있는지에 대해 설명했습니다. 이제 느린 데이터 요청이 있을 때 사용자 환경을 개선할 수 있는 방법을 살펴보겠습니다.
In this chapter
앞으로 다룰 주제는 다음과 같습니다.
- 스트리밍이란 무엇이며 언제 사용할 수 있는지
loading.tsx및 Suspense로 스트리밍을 구현하는 방법- Loading skeleton이란 무엇인지
- route groups란 무엇이며 언제 사용할 수 있는지
- 애플리케이션에서 Suspense 경계를 배치할 위치
What is streaming
스트리밍은 경로를 더 작은 덩어리로 나누고 준비되는 대로 서버에서 클라이언트로 점진적으로 스트리밍할 수 있는 데이터 전송 기술입니다.
 출처 : Next.js Learn
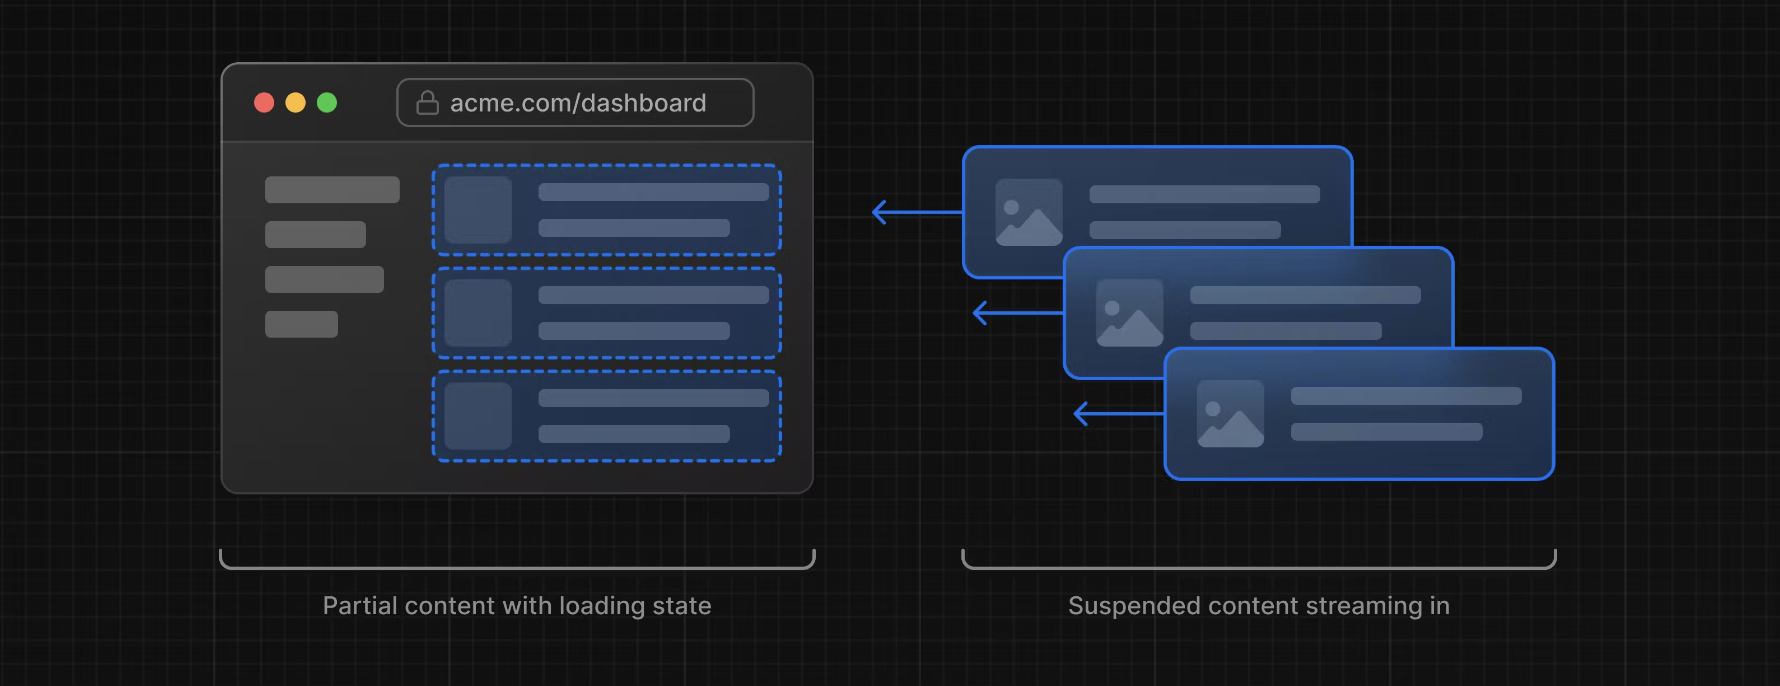
스트리밍을 사용하면 느린 데이터 요청으로 인해 전체 페이지가 차단되는 것을 방지할 수 있습니다. 이를 통해 사용자는 모든 데이터가 로드될 때까지 기다리지 않고도 페이지의 일부를 보고 상호 작용할 수 있습니다.
 출처 : Next.js Learn
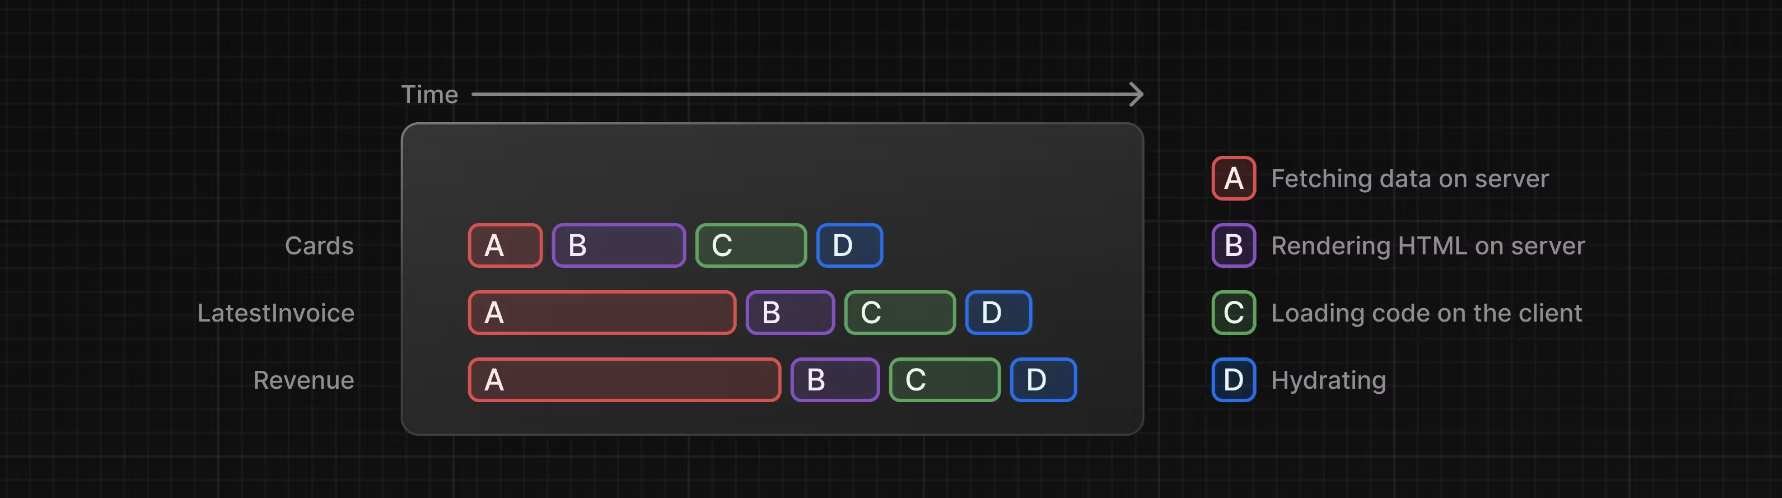
스트리밍은 각 컴포넌트가 하나의 덩어리로 간주될 수 있기 때문에 React의 컴포넌트 모델과 잘 어울립니다.
Next.js에서 스트리밍을 구현하는 방법에는 두 가지가 있습니다.
- 페이지 수준에서
loading.tsx파일을 사용합니다. - 특정 컴포넌트의 경우
<Suspense>를 사용합니다.
Streaming a whole page with loading.tsx
/app/dashboard 폴더에 loading.tsx라는 새 파일을 만듭니다.
1
2
3
4
5
// /app/dashboard/loading.tsx

export default function Loading() {
  return <div>Loading...</div>;
}
http://localhost:3000/dashboard 새로고침하면 이제 표시됩니다.
 출처 : Next.js Learn
여기서는 몇 가지 일이 일어나고 있습니다.
loading.tsx는 Suspense 위에 구축된 특별한 Next.js 파일로 페이지 콘텐츠가 로드되는 동안 대체로 표시할 fallback UI를 만들 수 있습니다.<Sidebar>는 정적이므로 즉시 표시됩니다. 사용자는 동적 콘텐츠가 로드되는 동안<Sidebar>와 상호 작용할 수 있습니다.- 사용자는 페이지 로딩이 완료될때까지 기다렸다가 다른 페이지로 이동할 필요가 없습니다. 이를 interruptable navigation이라고 합니다.
방금 스트리밍을 구현했습니다. 하지만 사용자 경험을 개선하기 위해 더 많은 일을 할 수 있습니다.
Adding loading skeletons
로딩 스켈레톤은 UI의 단순화된 버전입니다. 많은 웹사이트에서 콘텐츠가 로드 중임을 사용자에게 알리기 위한 플레이스 홀더(또는 롤백)로 사용합니다. loading.tsx에 임베드하는 모든 UI는 정적 파일의 일부로 임베드되어 먼저 전송됩니다. 그런 다음 나머지 동적 콘텐츠가 서버에서 클라이언트로 스트리밍됩니다. loading.tsx 파일 내에서 <DashboardSkeleton>이라는 새 컴포넌트를 가져옵니다.
1
2
3
4
5
6
7
// /app/dashboard/loading.tsx

import DashboardSkeleton from '@/app/ui/skeletons';

export default function Loading() {
  return <DashboardSkeleton />;
}
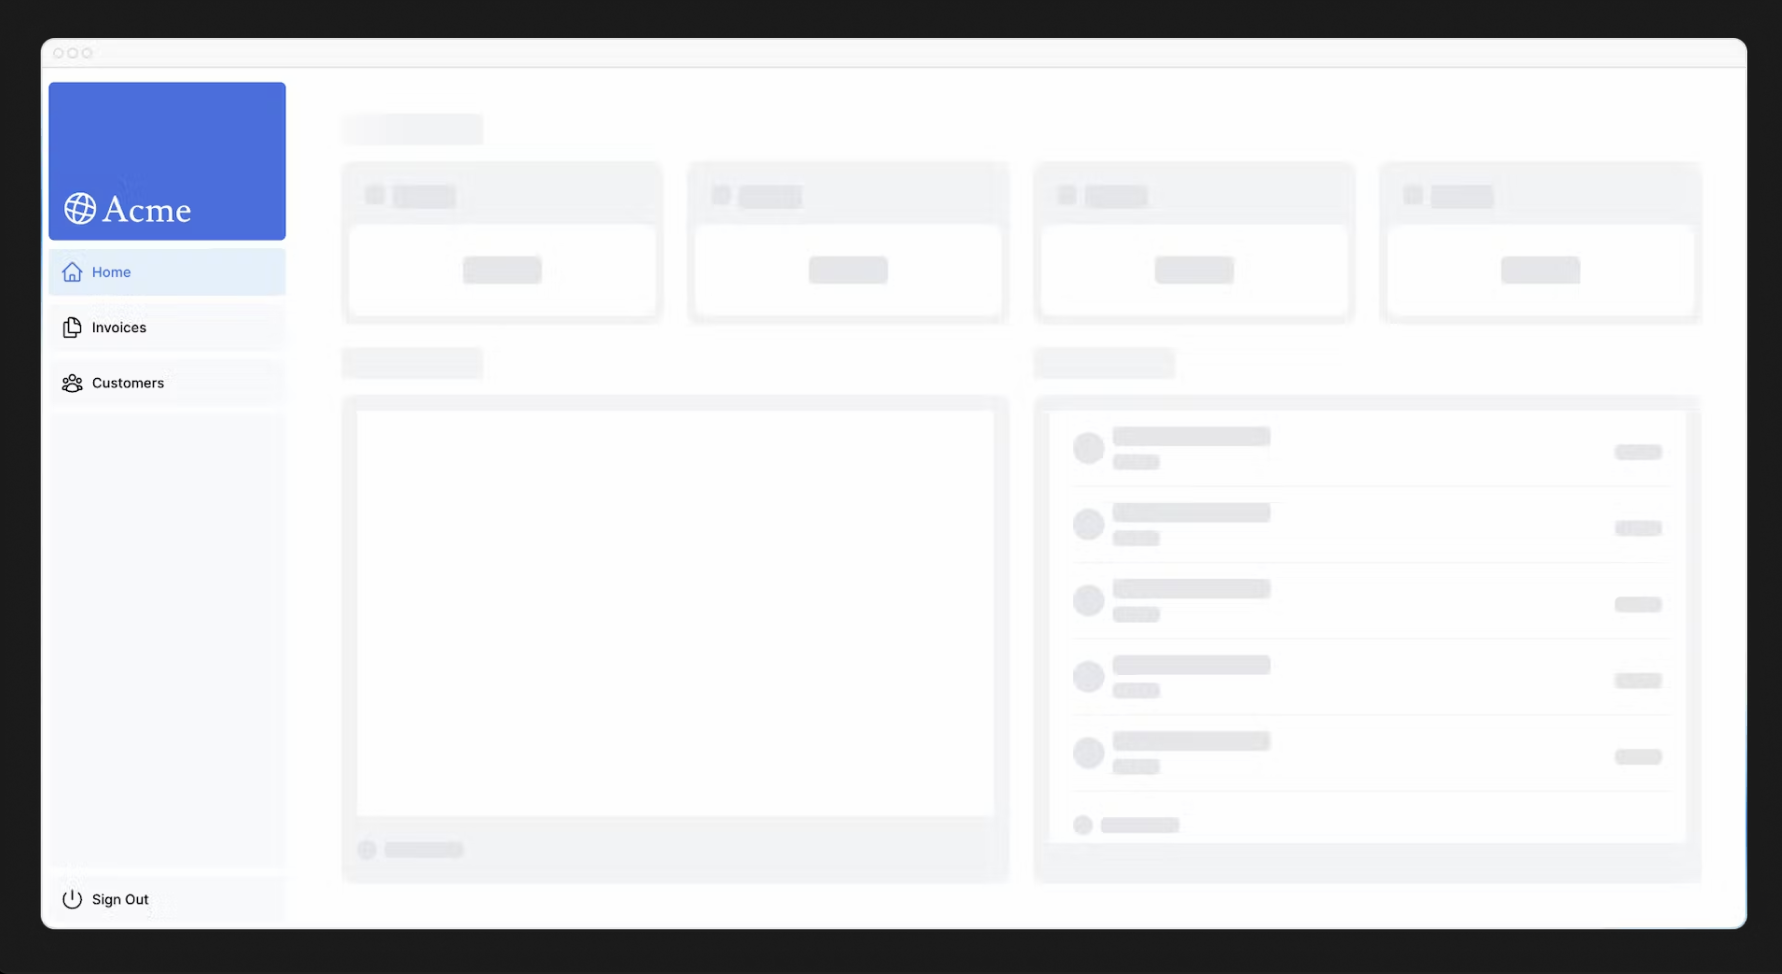
http://localhost:3000/dashboard을 새로고침하면 이제 표시됩니다.
 출처 : Next.js Learn
Fixing the loading skeleton bug with route groups
이제 로딩 스켈레톤이 invoices 및 customers 페이지에도 적용됩니다. loading.tsx는 파일 시스템에서 /invoices/page.tsx 및 /customer/page.tsx 보다 상위 레벨에 있으므로 해당 페이지에도 적용됩니다. Route Groups를 사용하여 이를 변경할 수 있습니다. 대시보드 폴더 안에 /(overview)라는 새 폴더를 만듭니다. 그런 다음 loading.tsx 및 page.tsx 파일을 폴더 안으로 옮깁니다.
 출처 : Next.js Learn
이제 loading.tsx 파일은 대시보드 개요 페이지에만 적용됩니다. Route Groups를 사용하면 URL path 구조에 영향을 주지 않고 파일을 논리적인 그룹으로 구성할 수 있습니다. 괄호 ()를 사용하여 새 폴더를 만들면 그 이름이 URL path에 포함되지 않습니다. 따라서 /dashboard/(overview)/page.tsx는 /dashboard가 됩니다.
여기서는 Route Groups 사용하여 loading.tsx가 대시보드 개요 페이지에만 적용되도록 하고 있습니다. 그러나 Route Groups를 사용하여 애플리케이션을 섹션(e.g (marketing) routes 및 (shop) routes)로 분리하거나 더 큰 애플리케이션의 경우 팀별로 분리할 수도 있습니다.
Streaming a component
지금까지는 전체 페이지를 스트리밍하고 있습니다. 하지만 그 대신 React Suspense를 사용하면 더 세분화하여 특정 컴포넌트를 스트리밍할 수 있습니다. Suspense를 사용하면 특정 조건이 충족될 때까지 애플리케이션의 일부 렌더링을 지연시킬 수 있습니다. 동적 컴포넌트를 Suspense로 래핑할 수 있습니다. 그런 다음 동적 컴포넌트가 로드되는 동안 표시할 폴백 컴포넌트를 전달합니다.
느린 데이터 요청인 fetchRevenue()는 전체 페이지의 속도를 저하시키는 요청입니다. 페이지를 차단하는 대신 Suspense를 사용하여 이 컴포넌트만 스트리밍하고 페이지의 나머지 UI를 즉시 표시할 수 있습니다. 이렇게 하려면 데이터 불러오기를 컴포넌트로 이동해야 합니다. 코드를 업데이트하여 어떤 모습인지 살펴보겠습니다. /dashboard/(overview)/page.tsx에서 fetchRevenue()의 모든 인스턴스와 해당 데이터를 삭제합니다.
1
2
3
4
5
6
7
8
9
10
11
12
13
14
15
16
17
18
19
20
21
22
// /app/dashboard/(overview)/page.tsx

import { Card } from '@/app/ui/dashboard/cards';
import RevenueChart from '@/app/ui/dashboard/revenue-chart';
import LatestInvoices from '@/app/ui/dashboard/latest-invoices';
import { lusitana } from '@/app/ui/fonts';
import { fetchLatestInvoices, fetchCardData } from '@/app/lib/data'; // remove fetchRevenue

export default async function Page() {
  const revenue = await fetchRevenue // delete this line
  const latestInvoices = await fetchLatestInvoices();
  const {
    numberOfInvoices,
    numberOfCustomers,
    totalPaidInvoices,
    totalPendingInvoices,
  } = await fetchCardData();

  return (
    // ...
  );
}
그런 다음 React에서 <Suspense>를 가져와서 <RevenueChart />를 감싸줍니다. 이 컴포넌트에 <RevenueChartSkeleton>이라는 폴백 컴포넌트를 전달할 수 있습니다.
1
2
3
4
5
6
7
8
9
10
11
12
13
14
15
16
17
18
19
20
21
22
23
24
25
26
27
28
29
30
31
32
33
34
35
36
37
38
39
40
41
42
43
// /app/dashboard/(overview)/page.tsx

import { Card } from '@/app/ui/dashboard/cards';
import RevenueChart from '@/app/ui/dashboard/revenue-chart';
import LatestInvoices from '@/app/ui/dashboard/latest-invoices';
import { lusitana } from '@/app/ui/fonts';
import { fetchLatestInvoices, fetchCardData } from '@/app/lib/data';
import { Suspense } from 'react';
import { RevenueChartSkeleton } from '@/app/ui/skeletons';

export default async function Page() {
  const latestInvoices = await fetchLatestInvoices();
  const {
    numberOfInvoices,
    numberOfCustomers,
    totalPaidInvoices,
    totalPendingInvoices,
  } = await fetchCardData();

  return (
    <main>
      <h1 className={`${lusitana.className} mb-4 text-xl md:text-2xl`}>
        Dashboard
      </h1>
      <div className="grid gap-6 sm:grid-cols-2 lg:grid-cols-4">
        <Card title="Collected" value={totalPaidInvoices} type="collected" />
        <Card title="Pending" value={totalPendingInvoices} type="pending" />
        <Card title="Total Invoices" value={numberOfInvoices} type="invoices" />
        <Card
          title="Total Customers"
          value={numberOfCustomers}
          type="customers"
        />
      </div>
      <div className="mt-6 grid grid-cols-1 gap-6 md:grid-cols-4 lg:grid-cols-8">
        <Suspense fallback={<RevenueChartSkeleton />}>
          <RevenueChart />
        </Suspense>
        <LatestInvoices latestInvoices={latestInvoices} />
      </div>
    </main>
  );
}
마지막으로 <RevenueChart>에서 데이터를 가져오고 전달된 props를 제거합니다.
1
2
3
4
5
6
7
8
9
10
11
12
13
14
15
16
17
18
19
20
21
22
23
// /app/ui/dashboard/revenue-chart.tsx

import { generateYAxis } from '@/app/lib/utils';
import { CalendarIcon } from '@heroicons/react/24/outline';
import { lusitana } from '@/app/ui/fonts';
import { fetchRevenue } from '@/app/lib/data';

// ...

export default async function RevenueChart() { // Make component async, remove the props
  const revenue = await fetchRevenue(); // Fetch data inside the component

  const chartHeight = 350;
  const { yAxisLabels, topLabel } = generateYAxis(revenue);

  if (!revenue || revenue.length === 0) {
    return <p className="mt-4 text-gray-400">No data available.</p>;
  }

  return (
    // ...
  );
}
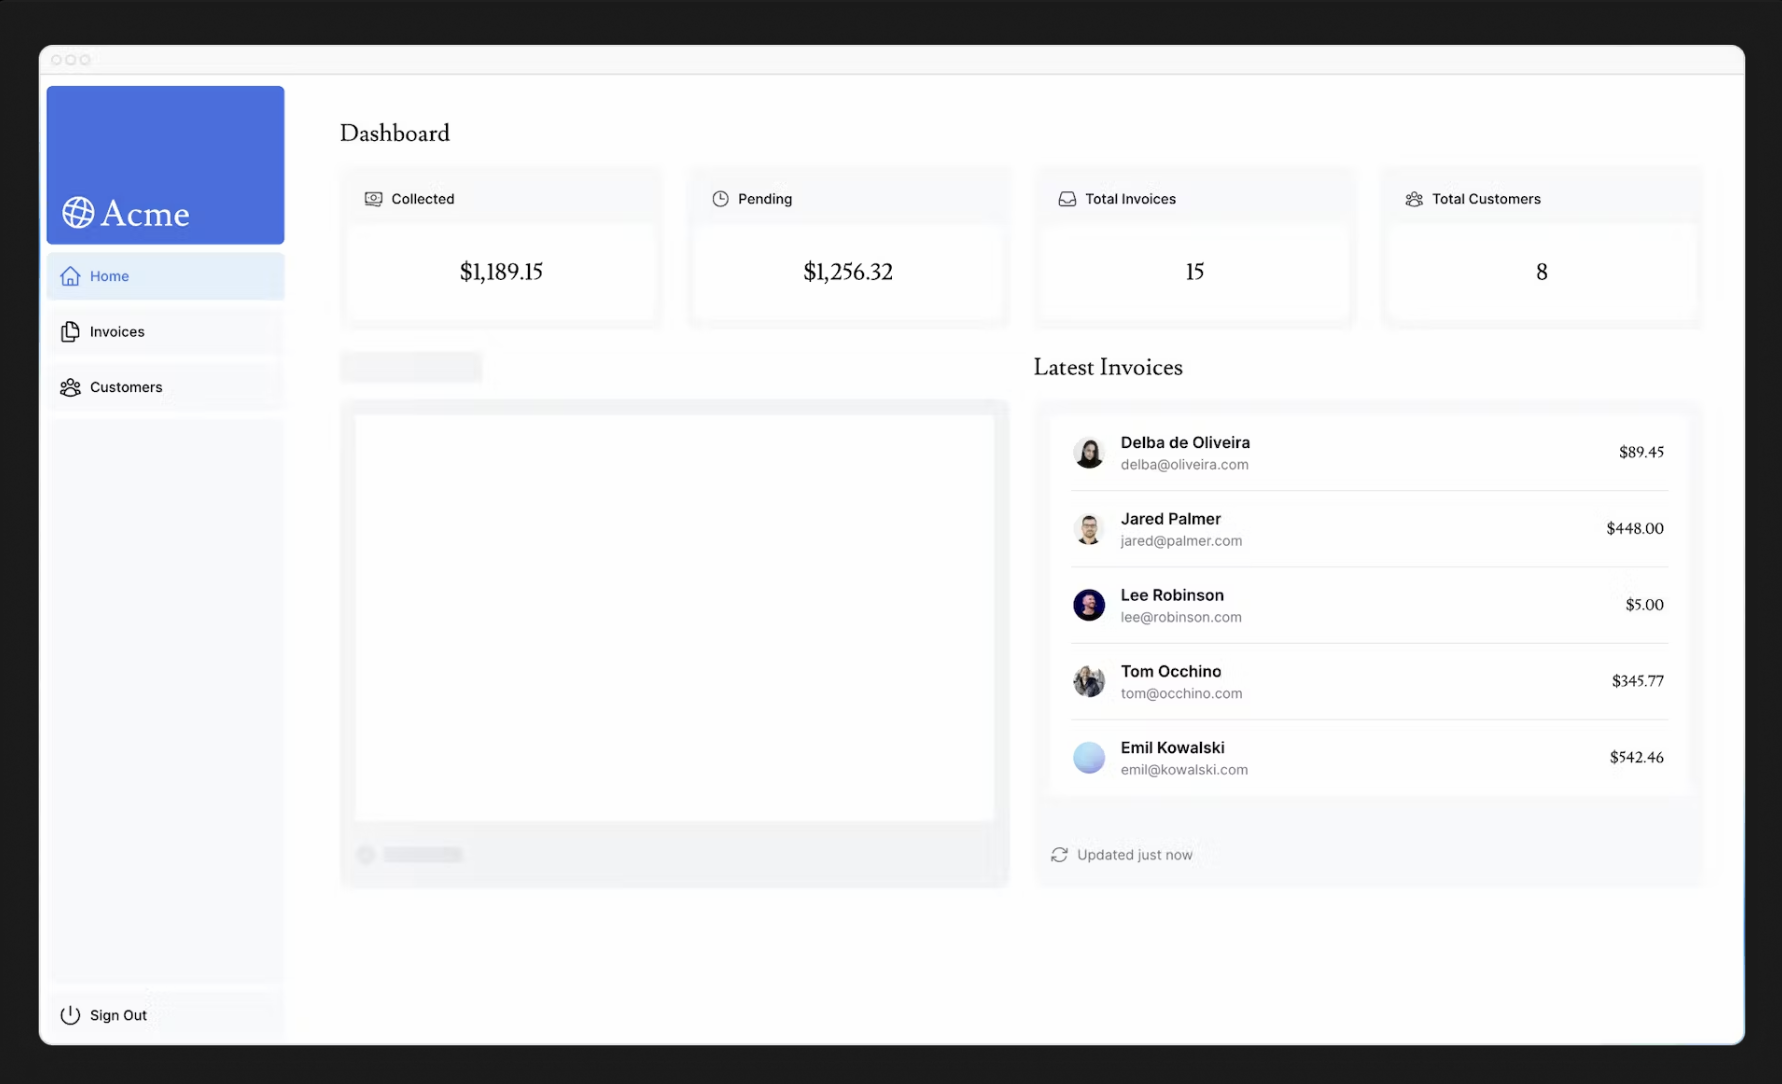
이제 페이지를 새로 고치면 대시보드 정보가 즉시 표시되고 <RevenueChart>에 대한 대체 스켈레톤이 표시됩니다.
 출처 : Next.js Learn
Practices : Streaming <LatestInvoices>
<LatestInvoices> 컴포넌트를 스트리밍하여 방금 배운 내용을 연습해보세요. 페이지에 있는 fetchLatestInvoices()를 <LatestInvoices> 컴포넌트 아래로 이동합니다. 컴포넌트를 <LatestInvoicesSkeleton> 폴백을 사용하여 <Suspense> 경계로 감쌉니다.
1
2
3
4
5
6
7
8
9
10
11
12
13
14
15
16
17
18
19
20
21
22
23
24
25
26
27
28
29
30
31
32
33
34
35
36
37
38
39
40
41
42
43
44
45
46
47
48
// /app/dashboard/(overview)/page.tsx

import { Card } from '@/app/ui/dashboard/cards';
import RevenueChart from '@/app/ui/dashboard/revenue-chart';
import LatestInvoices from '@/app/ui/dashboard/latest-invoices';
import { lusitana } from '@/app/ui/fonts';
import { fetchCardData } from '@/app/lib/data'; // Remove fetchLatestInvoices
import { Suspense } from 'react';
import {
  RevenueChartSkeleton,
  LatestInvoicesSkeleton,
} from '@/app/ui/skeletons';

export default async function Page() {
  // Remove `const latestInvoices = await fetchLatestInvoices()`
  const {
    numberOfInvoices,
    numberOfCustomers,
    totalPaidInvoices,
    totalPendingInvoices,
  } = await fetchCardData();

  return (
    <main>
      <h1 className={`${lusitana.className} mb-4 text-xl md:text-2xl`}>
        Dashboard
      </h1>
      <div className="grid gap-6 sm:grid-cols-2 lg:grid-cols-4">
        <Card title="Collected" value={totalPaidInvoices} type="collected" />
        <Card title="Pending" value={totalPendingInvoices} type="pending" />
        <Card title="Total Invoices" value={numberOfInvoices} type="invoices" />
        <Card
          title="Total Customers"
          value={numberOfCustomers}
          type="customers"
        />
      </div>
      <div className="mt-6 grid grid-cols-1 gap-6 md:grid-cols-4 lg:grid-cols-8">
        <Suspense fallback={<RevenueChartSkeleton />}>
          <RevenueChart />
        </Suspense>
        <Suspense fallback={<LatestInvoicesSkeleton />}>
          <LatestInvoices />
        </Suspense>
      </div>
    </main>
  );
}
<LatestInvoices> 컴포넌트의 props를 제거합니다.
1
2
3
4
5
6
7
8
9
10
11
12
13
14
15
// /app/ui/dashboard/latest-invoices.tsx

import { ArrowPathIcon } from '@heroicons/react/24/outline';
import clsx from 'clsx';
import Image from 'next/image';
import { lusitana } from '@/app/ui/fonts';
import { fetchLatestInvoices } from '@/app/lib/data';

export default async function LatestInvoices() { // Remove props
  const latestInvoices = await fetchLatestInvoices();

  return (
    // ...
  );
}
Grouping components
이제 <Card> 컴포넌트를 Suspense로 감싸야 합니다. 개별 카드에 대한 데이터를 가져올 수 있지만, 이렇게 하면 카드가 로드될 때 카드가 튀어나오는 효과가 발생하여 사용자에게 시각적으로 어색할 수 있습니다. 그렇다면 이 문제를 어떻게 해결할 수 있을까요?
Wrapper 컴포넌트를 사용하여 카드를 그룹화할 수 있습니다. page.tsx 파일에서
<Card>컴포넌트를 삭제합니다.fetchCardData()함수를 삭제합니다.- Wrapper 컴포넌트인
<CardWrapper />를 가져옵니다. - 스켈레톤 컴포넌트인
<CardsSkeleton />을 가져옵니다. <CardWrapper />를 Suspense로 감쌉니다.
1
2
3
4
5
6
7
8
9
10
11
12
13
14
15
16
17
18
19
20
21
22
23
24
25
// /app/dashboard/page.tsx

import CardWrapper from '@/app/ui/dashboard/cards';
// ...
import {
  RevenueChartSkeleton,
  LatestInvoicesSkeleton,
  CardsSkeleton,
} from '@/app/ui/skeletons';

export default async function Page() {
  return (
    <main>
      <h1 className={`${lusitana.className} mb-4 text-xl md:text-2xl`}>
        Dashboard
      </h1>
      <div className="grid gap-6 sm:grid-cols-2 lg:grid-cols-4">
        <Suspense fallback={<CardsSkeleton />}>
          <CardWrapper />
        </Suspense>
      </div>
      // ...
    </main>
  );
}
그럼 다음 /app/ui/dashboard/cards.tsx 파일로 이동하여 fetchCardData() 함수를 가져온 다음 <CardWrapper /> 컴포넌트 내에서 이를 호출합니다. 이 컴포넌트에서 필요한 코드의 주석 처리를 해제합니다.
1
2
3
4
5
6
7
8
9
10
11
12
13
14
15
16
17
18
19
20
21
22
23
24
25
26
27
28
// /app/ui/dashboard/cards.tsx

// ...
import { fetchCardData } from '@/app/lib/data';

// ...

export default async function CardWrapper() {
  const {
    numberOfInvoices,
    numberOfCustomers,
    totalPaidInvoices,
    totalPendingInvoices,
  } = await fetchCardData();

  return (
    <>
      <Card title="Collected" value={totalPaidInvoices} type="collected" />
      <Card title="Pending" value={totalPendingInvoices} type="pending" />
      <Card title="Total Invoices" value={numberOfInvoices} type="invoices" />
      <Card
        title="Total Customers"
        value={numberOfCustomers}
        type="customers"
      />
    </>
  );
}
페이지를 개로 고치면 모든 카드가 동시에 로드되는 것을 볼 수 있습니다. 여러 컴포넌트가 동시에 로드되도록 하려는 경우 이 패턴을 사용할 수 있습니다.
Deciding where to place your Suspense boundaries
Suspense 경계를 어디에 설정할지는 몇 가지 요소에 따라 달라집니다.
- 사용자가 페이지가 스트리밍되는 동안 어떤 경험을 원하는지
- 우선순위를 지정할 콘텐츠가 있는 경우
- 구성 요소가 데이터 가져오기에 의존하는 경우
대시보드 페이지를 살펴보면서 다르게 처리할 수 있는 부분이 있나요? 정답은 없습니다.
loading.tsx에서 했던 것처럼 전체 페이지를 스트리밍할 수도 있지만, 구성 요소 중 하나에 데이터 가져오기가 느린 경우 로딩 시간이 길어질 수 있습니다.- 모든 컴포넌트를 개별적으로 스트리밍할 수도 있지만, 준비가 완료된 UI가 개별적으로 화면에 튀어나오는 현상이 발생할 수 있습니다.
- 페이지 섹션을 스트리밍하여 엇갈리게 표시하는 효과를 만들 수도 있습니다. 하지만 래퍼 컴포넌트를 만들어야 합니다.
Suspense 경계를 배치하는 위치는 애플리케이션에 따라 달라질 수 있습니다. 일반적으로 데이터 가져오기를 필요한 컴포넌트로 이동한 다음 해당 컴포넌트를 Suspense로 감싸는 것이 좋습니다. 그러나 애플리케이션에 필요한 경우 섹션 또는 전체 페이지를 스트리밍하는 것이 잘못된 것은 아닙니다. Suspense는 더욱 즐거운 사용자 경험을 만드는 데 도움이 되는 강력한 API이므로 두려워하지 마시고 무엇이 가장 효과적인지 실험해 보시기 바랍니다.
Looking ahead
스트리밍 및 서버 컴포넌트는 궁극적으로 최종 사용자 경험을 개선하는 것을 목표로 데이터 불러오기 및 로드 상태를 처리하는 새로운 방법을 제공합니다. 다음 장에서는 스트리밍을 염두에 두고 구축된 새로운 Next.js 렌더링 모델인 Partial Prerendering에 대해 알아보겠습니다.