Next.js Learn - 12. Mutating Data 번역

본 포스팅은 Next.js Learn의 Mutating Data 내용을 번역한 것입니다.
이전 장에서는 URL 검색 매개변수와 Next.js API를 사용하여 Search 및 Pagination을 구현했습니다. 이제 인보이스 생성, 업데이트 및 삭제 기능을 추가하여 인보이스 페이지에서 계속 작업해 보겠습니다.
In this chapter
앞으로 다룰 주제는 다음과 같습니다.
- React Server Action이란 무엇이며 이를 사용하여 데이터를 변경하는 방법
- Form과 서버 컴포넌트로 작업하는 방법
- 타입 유효성 검사를 포함한 기본
formData객체로 작업하는 모범 사례 revalidatePathAPI를 사용하여 클라이언트 캐시의 유효성을 재검증하는 방법- 특정 ID로 동적 경로 세그먼트를 만드는 방법
- Optimistic update를 위해 React의
useFormStatus훅을 사용하는 방법
What are Server Actions?
React Server Action을 사용하면 서버에서 직접 비동기 코드를 실행할 수 있습니다. 데이터를 변경하기 위해 API 엔드포인트를 만들 필요가 없습니다. 클라이언트 또는 서버 컴포넌트에서 호출할 수 있는 비동기 함수를 작성하면 됩니다.
Using forms with Server Actions
React에서는 <form> 엘리먼트의 action 속성을 사용하여 액션을 호출할 수 있습니다. 액션은 캡처된 데이터가 포함된 네이티브 FormData 객체를 자동으로 수신합니다. 예를 들어
1
2
3
4
5
6
7
8
9
10
11
12
// Server Component
export default function Page() {
  // Action
  async function create(formData: FormData) {
    'use server';

    // Logic to mutate data...
  }

  // Invoke the action using the "action" attribute
  return <form action={create}>...</form>;
}
서버 컴포넌트 내에서 Server Action을 호출하면 클라이언트에서 자바스크립트가 비활성화되어 있어도 form이 작동하는 점진적 개선의 이점이 있습니다.
Next.js with Server Actions
Server Action은 Next.js 캐싱과도 긴밀하게 통합되어 있습니다. Server Action을 통해 form이 제출되면 해당 액션을 사용하여 데이터를 변경할 수 있을 뿐만 아니라 revalidatePath 및 revalidateTag와 같은 API를 사용하여 관련 캐시의 유효성을 다시 검사할 수 있습니다. 이 모든 것이 어떻게 작동하는지 함께 살펴봅시다!
Creating an invoice
새 인보이스를 생성하는 단계는 다음과 같습니다.
- 사용자의 입력을 캡처할 form을 만듭니다.
- Server Action을 만들고 form을 호출합니다.
- Server Action 내에서
formData객체 데이터를 추출합니다. - 데이터베이스에 삽입할 데이터의 유효성을 검사하고 준비합니다.
- 데이터를 삽입하고 오류를 처리합니다.
- 캐시의 유효성을 다시 검사하고 사용자를 인보이스 페이지로 다시 리디렉션합니다.
1. Create a new route and form
시작하려면 /invoices 폴더 안에 /create라는 새 경로 세그먼트를 page.tsx 파일과 함께 추가합니다.

이 경로를 사용하여 새 인보이스를 만들게 됩니다. page.tsx 파일에 다음 코드를 붙여넣고 잠시 시간을 내어 살펴보세요.
1
2
3
4
5
6
7
8
9
10
11
12
13
14
15
16
17
18
19
20
21
22
23
24
25
// /dashboard/invoices/create/page.tsx

import Form from '@/app/ui/invoices/create-form';
import Breadcrumbs from '@/app/ui/invoices/breadcrumbs';
import { fetchCustomers } from '@/app/lib/data';

export default async function Page() {
  const customers = await fetchCustomers();

  return (
    <main>
      <Breadcrumbs
        breadcrumbs={[
          { label: 'Invoices', href: '/dashboard/invoices' },
          {
            label: 'Create Invoice',
            href: '/dashboard/invoices/create',
            active: true,
          },
        ]}
      />
      <Form customers={customers} />
    </main>
  );
}
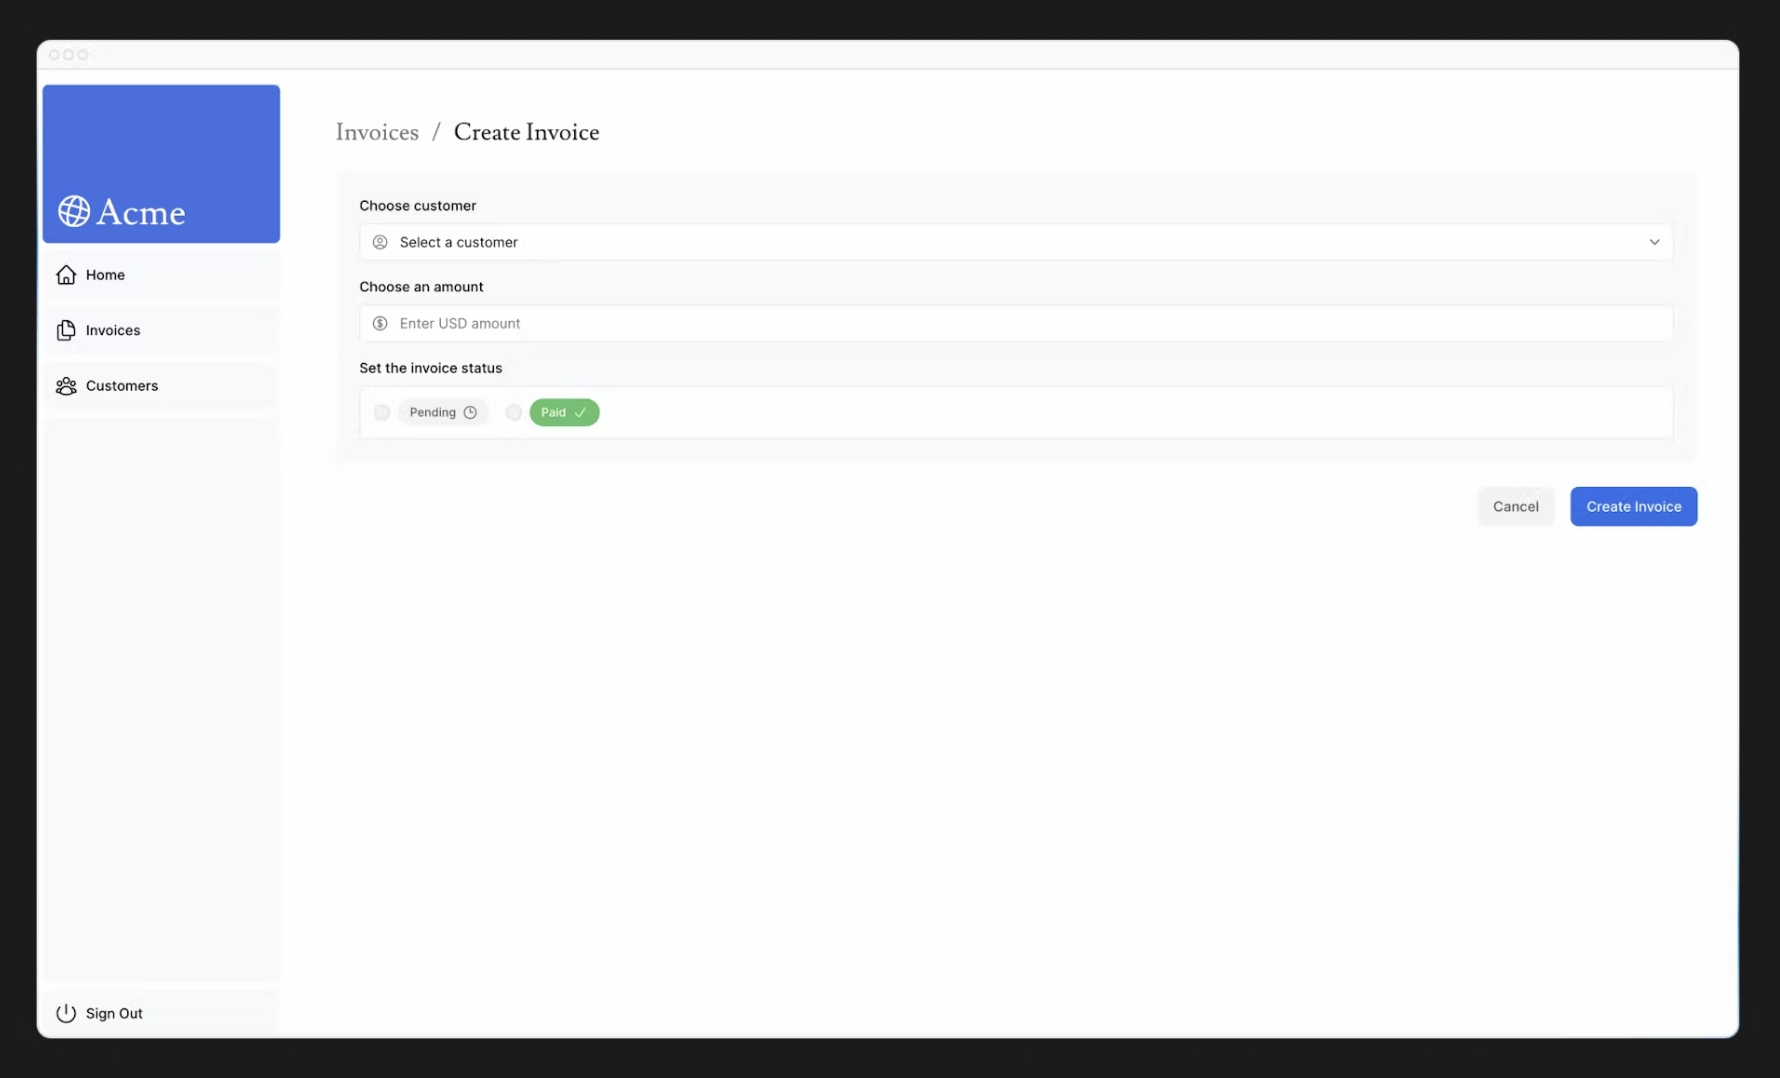
페이지는 customer을 가져와서 <Form> 컴포넌트에 전달하는 서버 컴포넌트입니다. <From> 컴포넌트로 이동하면 form이 표시됩니다.
- 고객 목록이 있는
<select>요소가 하나 있습니다. - 금액에 대해
type="number"인<input>요소가 하나 있습니다. type="radio"인 상태에 대한 두 개의<input>요소가 있습니다.type=submit인 버튼 하나가 있습니다.
http://localhost:3000/dashboard/invoices/create에 다음 UI가 표시됩니다.
2. Create a Server Action
이제 form이 제출될 때 호출될 Server Action을 만들어 보겠습니다. lib 디렉토리로 이동하여 actions.ts라는 이름의 새 파일을 만듭니다. 이 파일의 맨 위에 React use server 지시문을 추가합니다.
1
2
3
// /app/lib/actions.ts

'use server';
use server를 추가하면 파일 내에서 내보낸 모든 함수를 서버 함수로 표시할 수 있습니다. 그런 다음 이러한 서버 함수를 클라이언트 및 서버 컴포넌트로 가져올 수 있으므로 매우 다양하게 활용할 수 있습니다. 서버 컴포넌트 내부에서 직접 Server Action을 작성할 수도 있는데, 액션 안에 use server를 추가하면 됩니다. 하지만 이 강좌에서는 모두 별도의 파일에 정리해 두겠습니다.
actions.ts 파일에서 formData를 받아들이는 새 비동기 함수를 만듭니다.
1
2
3
4
5
// /app/lib/actions.ts

'use server';

export async function createInvoice(formData: FormData) {}
그런 다음 <Form> 컴포넌트에서 actions.ts 파일의 createInvoice를 가져옵니다. <form> 요소에 action 속성을 추가하고 createInvoice 액션을 호출합니다.
1
2
3
4
5
6
7
8
9
10
11
12
13
14
15
16
17
18
19
20
21
22
23
24
25
// /app/ui/invoices/create-form.tsx

'use client';

import { customerField } from '@/app/lib/definitions';
import Link from 'next/link';
import {
  CheckIcon,
  ClockIcon,
  CurrencyDollarIcon,
  UserCircleIcon,
} from '@heroicons/react/24/outline';
import { Button } from '@/app/ui/button';
import { createInvoice } from '@/app/lib/actions';

export default function Form({
  customers,
}: {
  customers: customerField[];
}) {
  return (
    <form action={createInvoice}>
      // ...
  )
}
Good to know
HTML에서는action속성에 URL을 전달합니다. 이 URL은 form 데이터를 제출해야 하는 대상(일반적으로 API 엔드포인트)이 됩니다. 하지만 React에서action속성은 특별한 프롭으로 간주되며, 이는 React가 액션을 호출할 수 있도록 그 위에 빌드된다는 것을 의미합니다. 뒤에서 Server Action은 POST API 엔드포인트를 생성합니다. 그렇기 때문에 Server Action을 사용할 때 API 엔드포인트를 수동으로 만들 필요가 없습니다.
3. Extract the data from formData
actions.ts 파일로 돌아가서 formData의 값을 추출해야 하는데, 사용할 수 있는 몇 가지 메서드가 있습니다. 이 예제에서는 .get(name) 메서드를 사용하겠습니다.
1
2
3
4
5
6
7
8
9
10
11
12
13
// /app/lib/actions.ts

'use server';

export async function createInvoice(formData: FormData) {
  const rawFormData = {
    customerId: formData.get('customerId'),
    amount: formData.get('amount'),
    status: formData.get('status'),
  };
  // Test it out:
  console.log(rawFormData);
}
Tip
필드가 많은 form으로 작업하는 경우 JavaScript의Object.formEntries()와 함께entries()메서드를 사용하는 것을 고려할 수 있습니다. 예를 들어const rawFormData = Object.fromEntries(formData.entries())처럼 사용할 수 있습니다.
모든 것이 올바르게 연결되었는지 확인하려면 form을 제출해 보세요. 제출 후 방금 form에 입력한 데이터가 터미널에 기록된 것을 확인할 수 있습니다. 이제 데이터가 객체 모양이 되었으니 작업하기가 훨씬 쉬워질 것입니다.
4. Validate and prepare the data
Form 데이터를 데이터베이스로 보내기 전에 데이터가 올바른 형식과 올바른 유형으로 되어 있는지 확인해야 합니다. 이 과정의 앞부분을 기억하신다면 인보이스 테이블은 다음 형식의 데이터를 기대합니다.
1
2
3
4
5
6
7
8
9
// /app/lib/definitions.ts

export type Invoice = {
  id: string; // Will be created on the database
  customer_id: string;
  amount: number; // Stored in cents
  status: 'pending' | 'paid';
  date: string;
};
지금까지는 form에서 customer_id, amount, status만 확인할 수 있습니다.
Type validation and coercion
Form의 데이터가 데이터베이스의 예상 유형과 일치하는지 확인하는 것이 중요합니다. 예를 들어, 액션 안에 console.log를 추가하는 경우에
1
console.log(typeof rawFormData.amount);
amount가 number가 아닌 string 유형인 것을 알 수 있습니다. type="number"인 입력 요소는 실제로 number가 아닌 string을 반환하기 때문입니다. 유형 유효성 검사를 처리하는 데는 몇 가지 옵션이 있습니다. 수동으로 타입을 유효성 검사할 수도 있지만, 타입 유효성 검사 라이브러리를 사용하면 시간과 노력을 절약할 수 있습니다. 이 예제는 타입스크립트 유효성 검사 라이브러리인 Zod를 사용하겠습니다.
actions.ts 파일에서 Zod를 가져와서 form 객체의 모양과 일치하는 스키마를 형성합니다. 이 스키마는 formData를 데이터베이스에 저장하기 전에 유효성을 검사합니다.
1
2
3
4
5
6
7
8
9
10
11
12
13
14
15
16
17
18
19
// /app/lib/actions.ts

'use server';

import { z } from 'zod';

const FormSchema = z.object({
  id: z.string(),
  customerId: z.string(),
  amount: z.coerce.number(),
  status: z.enum(['pending', 'paid']),
  date: z.string(),
});

const CreateInvoice = FormSchema.omit({ id: true, date: true });

export async function createInvoice(formData: FormData) {
  // ...
}
amount 필드는 특별히 문자열을 숫자로 강제(변경)하는 동시에 해당 유형의 유효성을 검사하도록 설정되어 있습니다. 그런 다음 rawFormData를 CreateInvoice에 전달하여 유형의 유효성을 검사할 수 있습니다.
1
2
3
4
5
6
7
8
9
10
// /app/lib/actions.ts

// ...
export async function createInvoice(formData: FormData) {
  const { customerId, amount, status } = CreateInvoice.parse({
    customerId: formData.get('customerId'),
    amount: formData.get('amount'),
    status: formData.get('status'),
  });
}
Storing values in cents
일반적으로 데이터베이스에 화폐 값을 센트 단위로 저장하면 자바스크립트 부동소수점 오류를 없애고 정확도를 높일 수 있습니다. 금액을 센트로 변환해 보겠습니다.
1
2
3
4
5
6
7
8
9
10
11
// /app/lib/actions.ts

// ...
export async function createInvoice(formData: FormData) {
  const { customerId, amount, status } = CreateInvoice.parse({
    customerId: formData.get('customerId'),
    amount: formData.get('amount'),
    status: formData.get('status'),
  });
  const amountInCents = amount * 100;
}
Creating new dates
마지막으로 인보이스 생성 날짜에 “YYYY-MM-DD” 형식을 사용하여 새 날짜를 생성해 보겠습니다.
1
2
3
4
5
6
7
8
9
10
11
12
// /app/lib/actions.ts

// ...
export async function createInvoice(formData: FormData) {
  const { customerId, amount, status } = CreateInvoice.parse({
    customerId: formData.get('customerId'),
    amount: formData.get('amount'),
    status: formData.get('status'),
  });
  const amountInCents = amount * 100;
  const date = new Date().toISOString().split('T')[0];
}
5. Inserting the data into your database
이제 데이터베이스에 필요한 모든 값을 얻었으므로 새 인보이스를 데이터베이스에 삽입하는 SQL 쿼리를 만들고 변수를 전달할 수 있습니다.
1
2
3
4
5
6
7
8
9
10
11
12
13
14
15
16
17
18
19
20
21
// /app/lib/actions.ts

import { z } from 'zod';
import { sql } from '@vercel/postgres';

// ...

export async function createInvoice(formData: FormData) {
  const { customerId, amount, status } = CreateInvoice.parse({
    customerId: formData.get('customerId'),
    amount: formData.get('amount'),
    status: formData.get('status'),
  });
  const amountInCents = amount * 100;
  const date = new Date().toISOString().split('T')[0];

  await sql`
    INSERT INTO invoices (customer_id, amount, status, date)
    VALUES (${customerId}, ${amountInCents}, ${status}, ${date})
  `;
}
지금은 오류를 처리하고 있지 않습니다. 다음 장에서 다루도록 하겠습니다. 지금은 다음 단계로 넘어가겠습니다.
6. Revalidate and redirect
Next.js에는 사용자 브라우저에 일정 시간 동안 경로 세그먼트를 저장하는 Client-side Router Cache가 있습니다. 이 캐시는 prefetching과 함께 사용자가 서버에 대한 요청 횟수를 줄이면서 경로를 빠르게 탐색할 수 있도록 해줍니다. 인보이스 경로에 표시되는 데이터를 업데이트하고 있으므로 이 캐시를 지우고 서버에 대한 새 요청을 트리거하려고 합니다. 이 작업은 Next.js의 revalidatePath 함수를 사용하여 수행할 수 있습니다.
1
2
3
4
5
6
7
8
9
10
11
12
13
14
15
16
17
18
19
20
21
22
23
24
25
26
// /app/lib/actions.ts

'use server';

import { z } from 'zod';
import { sql } from '@vercel/postgres';
import { revalidatePath } from 'next/cache';

// ...

export async function createInvoice(formData: FormData) {
  const { customerId, amount, status } = CreateInvoice.parse({
    customerId: formData.get('customerId'),
    amount: formData.get('amount'),
    status: formData.get('status'),
  });
  const amountInCents = amount * 100;
  const date = new Date().toISOString().split('T')[0];

  await sql`
    INSERT INTO invoices (customer_id, amount, status, date)
    VALUES (${customerId}, ${amountInCents}, ${status}, ${date})
  `;

  revalidatePath('/dashboard/invoices');
}
데이터베이스가 업데이트되면 /dashboard/invoices 경로의 유효성이 다시 확인되고 서버에서 새 데이터를 가져옵니다. 이 시점에서 사용자를 /dashboard/invoices 페이지로 다시 리디렉션하고 싶을 수도 있습니다. 이 작업은 Next.js의 redirect 함수를 사용하여 수행할 수 있습니다.
1
2
3
4
5
6
7
8
9
10
11
12
13
14
15
16
17
// /app/lib/actions.ts

'use server';

import { z } from 'zod';
import { sql } from '@vercel/postgres';
import { revalidatePath } from 'next/cache';
import { redirect } from 'next/navigation';

// ...

export async function createInvoice(formData: FormData) {
  // ...

  revalidatePath('/dashboard/invoices');
  redirect('/dashboard/invoices');
}
축하합니다! 방금 첫 번째 Server Action을 구현했습니다. 새 인보이스를 추가하여 모든 것이 올바르게 작동하는지 테스트해보세요.
- 송장 제출 시
/dashboard/invoices경로로 리디렉션되어야 합니다. - 테이블 상단에 새 청구서가 표시되어야 합니다.
Updating an invoice
인보이스 form 업데이트는 인보이스 form 만들기와 비슷하지만 데이터베이스의 레코드를 업데이트하기 위해 인보이스 id를 전달해야 한다는 점에서 다릅니다. 인보이스 id를 가져와 전달하는 방법을 살펴보겠습니다.
인보이스를 업데이트하는 단계는 다음과 같습니다.
- 인보이스
id로 새 동적 경로 세그먼트를 생성합니다. - 페이지 매개변수에서 인보이스
id를 읽습니다. - 데이터베이스에서 특정 인보이스를 가져옵니다.
- Form에 인보이스 데이터를 미리 채웁니다.
- 데이터베이스에서 인보이스 데이터를 업데이트합니다.
1. Create a Dynamic Route Segment with the invoice id
정확한 새그먼트 이름을 모르거나 데이터를 기반으로 경로를 만들고자 할 때 Next.js를 사용하면 동적 경로 세그먼트를 만들 수 있습니다. 블로그 게시물 제목, 제품 페이지 등을 예로 들 수 있습니다. 폴더의 이름을 대괄호로 묶어 동적 경로 세그먼트를 만들 수 있습니다. 예를 들어 [id], [post] 또는 [slug]가 있습니다.
/invoices 폴더에서 [id]라는 새 동적 경로를 만든 다음 page.tsx 파일로 edit이라는 새 경로를 만듭니다. 파일 구조는 다음과 같아야 합니다.

<Table> 컴포넌트에서 테이블 레코드에서 인보이스 ID를 수신하는 <UpdateInvoice /> 버튼이 있는 것을 확인할 수 있습니다.
1
2
3
4
5
6
7
8
9
10
11
12
13
14
15
16
17
18
// /app/ui/invoices/table.tsx

export default async function InvoicesTable({
  query,
  currentPage,
}: {
  query: string;
  currentPage: number;
}) {
  return (
    // ...
    <td className="flex justify-end gap-2 whitespace-nowrap px-6 py-4 text-sm">
      <UpdateInvoice id={invoice.id} />
      <DeleteInvoice id={invoice.id} />
    </td>
    // ...
  );
}
<UpdateInvoice /> 컴포넌트로 이동하여 Link의 href를 업데이터하여 id 프로퍼티를 사용합니다. 템플릿 리터럴을 사용하여 동적 경로 세그먼트에 링크할 수 있습니다.
1
2
3
4
5
6
7
8
9
10
11
12
13
14
15
16
17
// /app/ui/invoices/buttons.tsx

import { PencilIcon, PlusIcon, TrashIcon } from '@heroicons/react/24/outline';
import Link from 'next/link';

// ...

export function UpdateInvoice({ id }: { id: string }) {
  return (
    <Link
      href={`/dashboard/invoices/${id}/edit`}
      className="rounded-md border p-2 hover:bg-gray-100"
    >
      <PencilIcon className="w-5" />
    </Link>
  );
}
2. Read the invoice id from page params
<Page> 컴포넌트로 돌아가서 다음 코드를 붙여넣습니다.
1
2
3
4
5
6
7
8
9
10
11
12
13
14
15
16
17
18
19
20
21
22
23
// /app/dashboard/invoices/[id]/edit/page.tsx

import Form from '@/app/ui/invoices/edit-form';
import Breadcrumbs from '@/app/ui/invoices/breadcrumbs';
import { fetchCustomers } from '@/app/lib/data';

export default async function Page() {
  return (
    <main>
      <Breadcrumbs
        breadcrumbs={[
          { label: 'Invoices', href: '/dashboard/invoices' },
          {
            label: 'Edit Invoice',
            href: `/dashboard/invoices/${id}/edit`,
            active: true,
          },
        ]}
      />
      <Form invoice={invoice} customers={customers} />
    </main>
  );
}
edit-form.tsx 파일에서 다른 form을 가져온다는 점을 제외하면 /create 청구서 페이지와 비슷합니다. 이 form은 customer’s name, invoice amount 및 status에 대한 defaultValue로 미리 채워져 있어야 합니다. form 필드를 미리 채우려면 id를 사용하여 특정 인보이스를 가져와야 합니다. 페이지 컴포넌트는 searchParams 외에도 id에 액세스하는데 사용할 수 있는 params라는 프로퍼티를 받습니다. 프로퍼티를 받으려면 <Page> 컴포넌트를 업데이트하면 됩니다.
1
2
3
4
5
6
7
8
9
10
// /app/dashboard/invoices/[id]/edit/page.tsx

import Form from '@/app/ui/invoices/edit-form';
import Breadcrumbs from '@/app/ui/invoices/breadcrumbs';
import { fetchCustomers } from '@/app/lib/data';

export default async function Page({ params }: { params: { id: string } }) {
  const id = params.id;
  // ...
}
3. Fetch the specific invoice
fetchInvoiceById라는 새 함수를 가져와서id를 인수로 전달합니다.fetchCustomers를 가져와서 드롭다운에 사용할 고객 이름을 가져옵니다.
Promise.all을 사용하여 인보이스와 고객을 동시에 가져올 수 있습니다.
1
2
3
4
5
6
7
8
9
10
11
12
13
14
// /dashboard/invoices/[id]/edit/page.tsx

import Form from '@/app/ui/invoices/edit-form';
import Breadcrumbs from '@/app/ui/invoices/breadcrumbs';
import { fetchInvoiceById, fetchCustomers } from '@/app/lib/data';

export default async function Page({ params }: { params: { id: string } }) {
  const id = params.id;
  const [invoice, customers] = await Promise.all([
    fetchInvoiceById(id),
    fetchCustomers(),
  ]);
  // ...
}
인보이스가 정의되지 않았을 가능성이 있기 때문에 터미널에서 invoices 프로퍼티에 대한 일시적인 TS 오류가 표시됩니다. 지금은 걱정하지 마세요. 다음 장에서 오류 처리 기능을 추가할 때 이 문제를 해결하게 될 것입니다. 이제 모든 것이 올바르게 연결되었는지 테스트해보세요. http://localhost:3000/dashboard/invoices를 방문하여 연필 아이콘을 클릭합니다. 탐색을 마치면 인보이스 세부 정보가 미리 채워진 form이 표시됩니다.
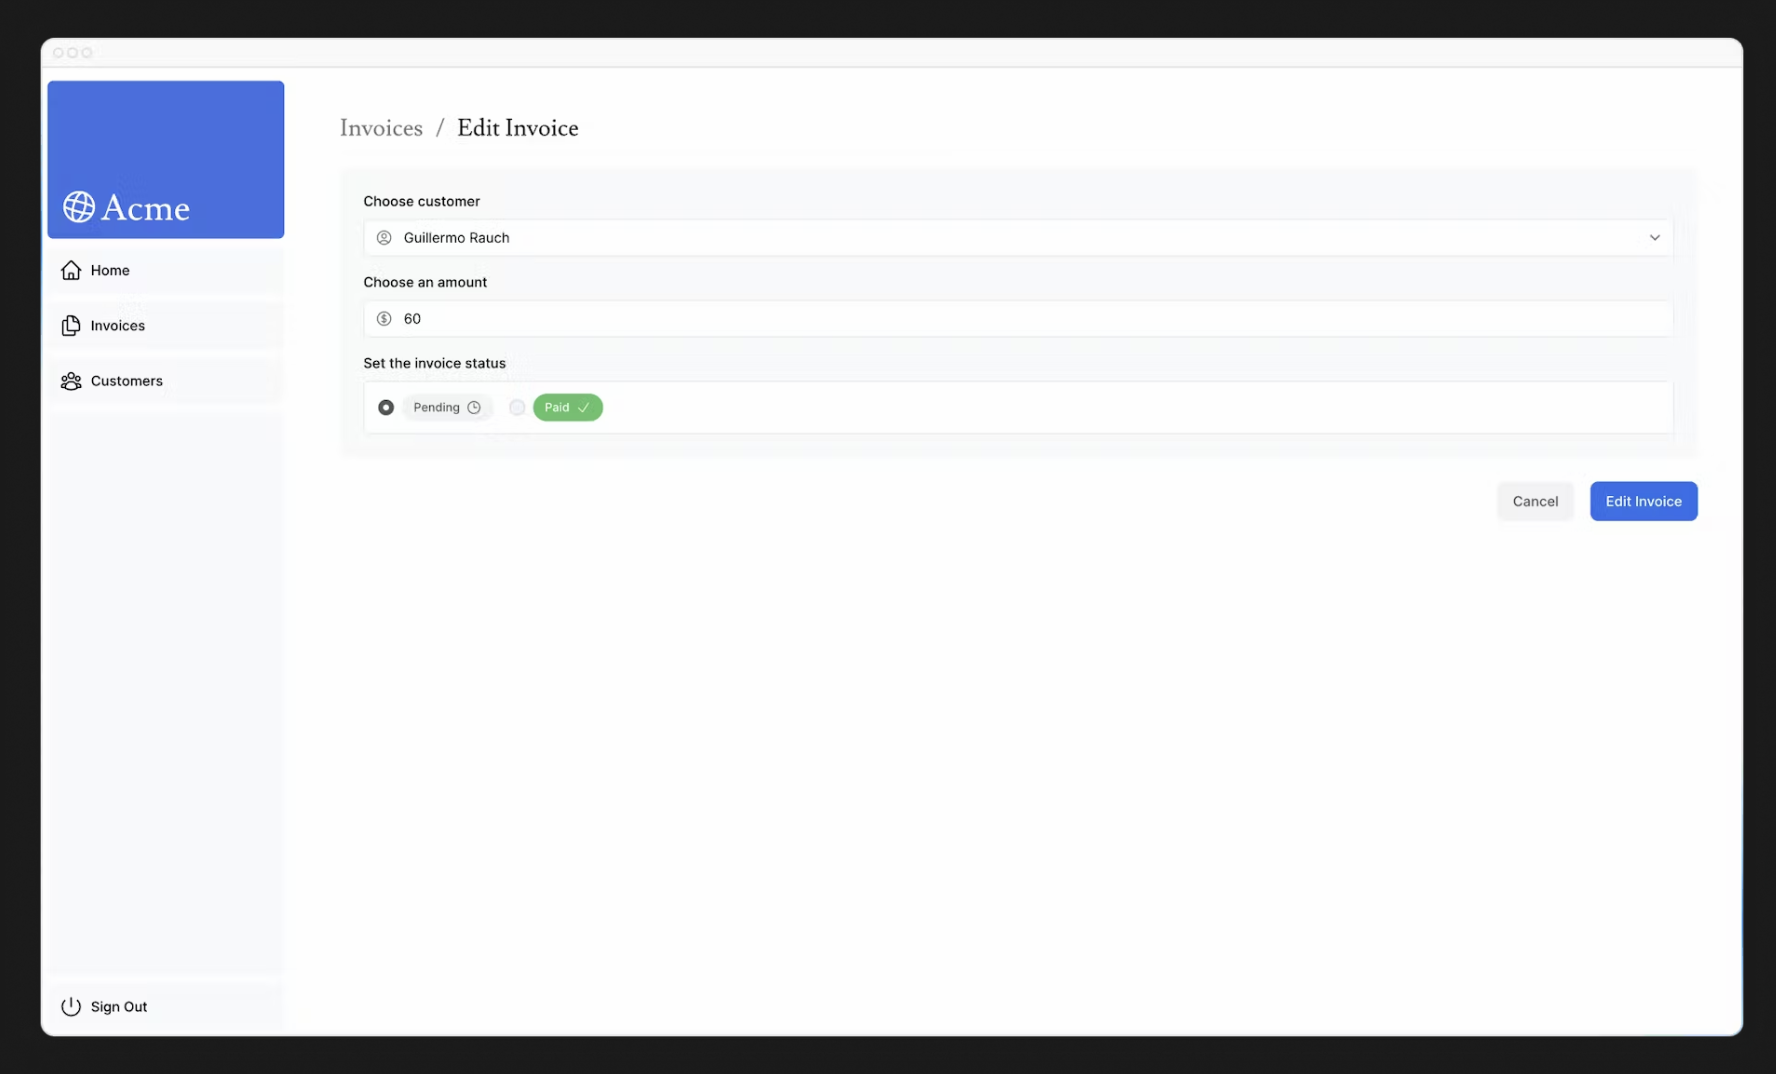
또한 URL은 다음과 같은 id로 업데이트해야 합니다. http://localhost:3000/dashboard/invoice/uuid/edit.
UUIDs vs Auto-incrementing Keys
당사는 incrementing keys(예: 1, 2, 3 등) 대신 UUID를 사용합니다. 이렇게 하면 URL이 길어지지만 UUID는 ID 충돌의 위험을 없애고 전 세계적으로 고유하며 열거 공격의 위험을 줄여주므로 대규모 데이터베이스에 이상적입니다. 그러나 더 깔끔한 URL을 선호한다면 incrementing keys를 사용하는 것이 좋습니다.
4. Pass the id to the Server Action
마지막으로 데이터베이스에서 올바른 레코드를 업데이트할 수 있도록 Server Action에 id를 전달하려고 합니다. 이렇게 아이디를 인수로 전달할 수는 없습니다.
1
2
3
4
// /app/ui/invoices/edit-form.tsx

// Passing an id as argument won't work
<form action={updateInvoice(id)}>
대신 JS 바인딩을 사용하여 Server Action에 id를 전달할 수 있습니다. 이렇게 하면 Server Action에 전달된 모든 값이 인코딩됩니다.
1
2
3
4
5
6
7
8
9
10
11
12
13
14
15
16
17
18
19
20
// /app/ui/invoices/edit-form.tsx

// ...
import { updateInvoice } from '@/app/lib/actions';

export default function EditInvoiceForm({
  invoice,
  customers,
}: {
  invoice: InvoiceForm;
  customers: CustomerField[];
}) {
  const updateInvoiceWithId = updateInvoice.bind(null, invoice.id);

  return (
    <form action={updateInvoiceWithId}>
      <input type="hidden" name="id" value={invoice.id} />
    </form>
  );
}
Note
Form에 숨겨진 입력 필드를 사용하는 것도 가능합니다(예:<input type="hidden" name="id" value={invoice.id} />). 그러나 값은 HTML 소스에서 전체 텍스트로 표시되므로 ID와 같은 민감한 데이터에는 적합하지 않습니다.
그런 다음 actions.ts 파일에서 새 작업인 updateInvoice를 만듭니다.
1
2
3
4
5
6
7
8
9
10
11
12
13
14
15
16
17
18
19
20
21
22
23
24
25
// /app/lib/actions.ts

// Use Zod to update the expected types
const UpdateInvoice = FormSchema.omit({ id: true, date: true });

// ...

export async function updateInvoice(id: string, formData: FormData) {
  const { customerId, amount, status } = UpdateInvoice.parse({
    customerId: formData.get('customerId'),
    amount: formData.get('amount'),
    status: formData.get('status'),
  });

  const amountInCents = amount * 100;

  await sql`
    UPDATE invoices
    SET customer_id = ${customerId}, amount = ${amountInCents}, status = ${status}
    WHERE id = ${id}
  `;

  revalidatePath('/dashboard/invoices');
  redirect('/dashboard/invoices');
}
createInvoice 작업과 유사하게 다음과 같습니다.
formData에서 데이터를 추출합니다.- Zod로 유형 유효성 검사를 합니다.
- 금액을 센트로 변환합니다.
- 변수를 SQL 쿼리에 전달합니다.
revalidatePath를 호출하여 클라이언트 캐시를 지우고 새 서버 요청을 수행합니다.redirect를 호출하여 사용자를 인보이스 페이지로 리디렉션합니다.
인보이스를 편집하여 테스트해 보세요. form을 제출한 후 인보이스 페이지로 리디렉션되고 인보이스가 업데이트되어야 합니다.
Deleting an invoice
Server Action을 사용하여 인보이스를 삭제하려면 삭제 버튼을 <form> 요소로 감싸고 bind를 사용하여 Server Action에 id를 전달합니다.
1
2
3
4
5
6
7
8
9
10
11
12
13
14
15
16
17
18
// /app/ui/invoices/buttons.tsx

import { deleteInvoice } from '@/app/lib/actions';

// ...

export function DeleteInvoice({ id }: { id: string }) {
  const deleteInvoiceWithId = deleteInvoice.bind(null, id);

  return (
    <form action={deleteInvoiceWithId}>
      <button className="rounded-md border p-2 hover:bg-gray-100">
        <span className="sr-only">Delete</span>
        <TrashIcon className="w-4" />
      </button>
    </form>
  );
}
actions.ts 파일 내에서 deleteInvoice라는 새 작업을 만듭니다.
1
2
3
4
5
6
// /app/lib/actions.ts

export async function deleteInvoice(id: string) {
  await sql`DELETE FROM invoices WHERE id = ${id}`;
  revalidatePath('/dashboard/invoices');
}
이 작업은 /dashboard/invoices 경로에서 호출되므로 redirect를 호출할 필요가 없습니다. revalidatePath를 호출하면 새 서버 요청이 트리거되고 테이블이 다시 렌더링됩니다.
Further reading
이 장에서는 Server Action을 사용하여 데이터를 변경하는 방법을 배웠습니다. 또한 revalidatePath API를 사용하여 Next.js 캐시를 재검증하고 redirect하여 사용자를 새 페이지로 리디렉션하는 방법도 배웠습니다. 추가 학습을 위해 Server Action을 통한 보안에 대한 자세한 내용을 읽어볼 수도 있습니다.