Next.js Learn - 14. Improving Accessibility 번역

본 포스팅은 Next.js Learn의 Improving Accessibility 내용을 번역한 것입니다.
이전 장에서는 오류(404 오류 포함)를 포착하고 사용자에게 대체 방법을 표시하는 방법을 살펴봤습니다. 하지만 퍼즐의 또 다른 조각인 form 유효성 검사에 대해 논의할 필요가 있습니다. Server Action으로 서버 측 유효성 검사를 구현하는 방법과 useFromState 훅을 사용하여 form 오류를 표시하는 방법을 살펴보겠습니다.
In this chapter
앞으로 다룰 주제는 다음과 같습니다.
- 접근성 모범 사례를 구현하기 위해 Next.js와 함께
eslint-plugin-jsx-a11y를 사용하는 방법 - 서버 측 form 유효성 검사를 구현하는 방법
- React
useFormState훅을 사용하여 form 오류를 처리하고 사용자에게 표시하는 방법
What is accessibility
접근성이랑 장애인을 포함한 모든 사람이 사용할 수 있는 웹 애플리케이션을 설계하고 구현하는 것을 말합니다. keyboard navigation, semantic HTML, images, colors, videos 등 다양한 영역을 포괄하는 방대한 주제입니다. 이 강좌에서는 접근성에 대해 자세히 다루지는 않지만, Next.js에서 사용할 수 있는 접근성 기능과 애플리케이션의 접근성을 높이기 위한 몇 가지 일반적인 관행에 대해 이야기 할 것입니다.
Note
접근성에 대해 자세히 알아보려면 web.dev의 Learn Accessibility 과정을 추천합니다.
Using the ESLint accessibility plugin in Next.js
기본적으로 Next.js에는 접근성 문제를 조기에 발견하는데 도움이 되는 eslint-plugin-jsx-a11y 플러그인이 포함되어 있습니다. 예를 들어 이 플러그인은 alt 텍스트가 없는 이미지가 있거나 aria-* 및 role 속성을 잘못 사용하는 등의 경우 경고를 표시합니다. 어떻게 동작하는지 살펴봅시다.
package.json 파일에 next lint를 스크립트로 추가합니다.
1
2
3
4
5
6
7
8
9
// /package.json

"scripts": {
    "build": "next build",
    "dev": "next dev",
    "seed": "node -r dotenv/config ./scripts/seed.js",
    "start": "next start",
    "lint": "next lint"
},
그런 다음 터미널에 npm run lint를 실행합니다.
1
npm run lint
다음 경고가 표시될 것입니다.
1
✔ No ESLint warnings or errors
하지만 alt 태그가 없는 이미지가 있다면 어떻게 될까요? /app/ui/invoices/table.tsx로 이동하여 이미지에서 alt 태그를 제거합니다. 편집기의 검색 기능을 사용하여 이미지 태그를 빠르게 찾을 수 있습니다.
1
2
3
4
5
6
7
8
9
// /app/ui/invoices/table.tsx

<Image
  src={invoice.image_url}
  className="rounded-full"
  width={28}
  height={28}
  alt={`${invoice.name}'s profile picture`} // Delete this line
/>
이제 npm run lint를 다시 실행하면 다음과 같은 경고가 표시됩니다.
1
2
3
./app/ui/invoices/table.tsx
45:25  Warning: Image elements must have an alt prop,
either with meaningful text, or an empty string for decorative images. jsx-a11y/alt-text
애플리케이션을 Vercel에 배포하려고 하면 빌드 로그에도 경고가 표시됩니다. 이는 next lint가 빌드 프로세스의 일부로 실행되기 때문입니다. 따라서 애플리케이션을 배포하기 전에 로컬에서 린트를 실행하여 접근성 문제를 파악할 수 있습니다.
Improving form accessibility
Form의 접근성을 개선하기 위해 이미 세 가지 작업을 진행하고 있습니다.
- Semantic HTML :
<div>대신 시맨틱 요소(<input>,<option>등)를 사용합니다. 이를 통해 Assistive Technologies(AT)가 입력 요소에 집중하여 사용자에게 적절한 문맥 정보를 제공함으로써 form을 더 쉽게 탐색하고 이해할 수 있습니다. - Labelling :
<label>과htmlFor속성을 포함하면 각 form 필드에 설명이 포함된 텍스트 레이블이 지정됩니다. 이렇게 하면 문맥을 제공하여 AT 지원이 향상되고 사용자가 레이블을 클릭하여 해당 입력 필드에 초점을 맞출 수 있어 사용성이 향상됩니다. - Focus Outline : 필드가 초점이 맞춰져 있을 때 윤곽선이 표시되도록 적절한 스타일이 지정됩니다. 이는 페이지의 활성 요소를 시각적으로 표시하여 키보드 및 스크린 리더 사용자가 form의 현재 위치를 파악하는데 도움이 되므로 접근성을 위해 매우 중요합니다.
tab을 눌러 이를 확인할 수 있습니다.
이러한 관행은 많은 사용자가 form에 더 쉽게 액세스할 수 있도록 하는 좋은 토대가 됩니다. 하지만 form에 대한 유효성 검사 및 오류는 해결하지 못합니다.
From validation
http://localhost:3000/dashboard/invoices/create로 이동하여 빈 form을 제출합니다. 오류가 발생합니다. 이는 빈 form 값을 Server Action으로 전송하기 때문입니다. 클라이언트 또는 서버에서 form의 유효성을 검사하여 이 문제를 방지할 수 있습니다.
Client-Side validation
클라이언트에서 form의 유효성을 검사하는 방법에는 몇 가지가 있습니다. 가장 간단한 방법은 form의 <input> 및 <select> 요소에 required 속성을 추가하여 브라우저에서 제공하는 form 유효성 검사에 의존하는 것입니다. 예를 들어
1
2
3
4
5
6
7
8
9
10
// /app/ui/invoices/create-form.tsx

<input
  id="amount"
  name="amount"
  type="number"
  placeholder="Enter USD amount"
  className="peer block w-full rounded-md border border-gray-200 py-2 pl-10 text-sm outline-2 placeholder:text-gray-500"
  required
/>
form을 다시 제출하면 이제 빈 값으로 form을 제출하려고 할 때 브라우저에 경고가 표시됩니다. 일부 AT는 브라우저 유효성 검사를 지원하므로 이 방법은 일반적으로 괜찮습니다. 클라이언트 측 유효성 검사의 대안은 서버 측 유효성 검사입니다.
Server-Side validation
서버에서 form의 유효성 검사를 할 수 있습니다.
- 데이터를 데이터베이스로 보내기 전에 데이터가 예상되는 형식인지 확인합니다.
- 악의적인 사용자가 클라이언트 측 유효성 검사를 우회하는 위험을 줄일 수 있습니다.
- 유효한 데이터로 간주되는 데이터에 대한 신뢰할 수 있는 단일 소스를 확보합니다.
create-form.tsx 컴포넌트에서 react-dom에서 useFormState 훅을 가져옵니다. useFromState는 훅이므로 "use client" 지시문을 사용하여 form을 클라이언트 컴포넌트로 전환해야 합니다.
1
2
3
4
5
6
// /app/ui/invoices/create-form.tsx

'use client';

// ...
import { useFormState } from 'react-dom';
Form 컴포넌트 내부의 useFormState 훅
- 두 개의 인수를 받습니다 :
(action, initialState) - 두 개의 값을 반환합니다 :
[state, dispatch]
createInvoices 작업을 useFormState 인수로 전달하고 <form action={}> 속성 내에서 dispatch를 호출합니다.
1
2
3
4
5
6
7
8
9
10
// /app/ui/invoices/create-form.tsx

// ...
import { useFormState } from 'react-dom';

export default function Form({ customers }: { customers: CustomerField[] }) {
  const [state, dispatch] = useFormState(createInvoice, initialState);

  return <form action={dispatch}>...</form>;
}
initialState는 사용자가 정의하는 모든 것이 될 수 있으며 이 경우 message와 errors라는 두 개의 빈 키가 있는 객체를 만듭니다.
1
2
3
4
5
6
7
8
9
10
11
// /app/ui/invoices/create-form.tsx

// ...
import { useFormState } from 'react-dom';

export default function Form({ customers }: { customers: CustomerField[] }) {
  const initialState = { message: null, errors: {} };
  const [state, dispatch] = useFormState(createInvoice, initialState);

  return <form action={dispatch}>...</form>;
}
처음에는 혼란스러워 보일 수 있지만 Server Actions를 업데이트하면 이해가 쉬워질 것입니다. action.ts 파일에서 Zod를 사용하여 form 데이터의 유효성을 검사할 수 있습니다. 다음과 같이 formSchema를 업데이트합니다.
1
2
3
4
5
6
7
8
9
10
11
12
13
14
15
// /app/lib/action.ts

const FormSchema = z.object({
  id: z.string(),
  customerId: z.string({
    invalid_type_error: 'Please select a customer.',
  }),
  amount: z.coerce
    .number()
    .gt(0, { message: 'Please enter an amount greater than $0.' }),
  status: z.enum(['pending', 'paid'], {
    invalid_type_error: 'Please select an invoice status.',
  }),
  date: z.string(),
});
customerId: 고객 필드가 비어 있으면string유형을 기대하기 때문에 Zod는 오류를 던집니다. 하지만 사용자가 고객을 선택하지 않은 경우 친절한 메세지를 추가해 보겠습니다.amount: 금액 유형을string에서number로 강제 변환하고 있습니다.string이 비어 있으면 기본값은 0이 됩니다..gt()함수를 사용하여 항상 0보다 큰 금액을 원한다고 Zod에게 전달해 보겠습니다.status: “pending” 또는 “paid”를 예상하여 상태 필드가 비어 있으면 Zod는 이미 오류를 던집니다. 또한 사용자가 상태를 선택하지 않은 경우 친절한 메세지를 추가해 보겠습니다.
다음으로 두 개의 매개 변수를 허용하도록 createInvoice 액션을 업데이트합니다.
1
2
3
4
5
6
7
8
9
10
11
12
13
14
15
// /app/lib/actions.ts

// This is temporary until @types/react-dom is updated
export type State = {
  errors?: {
    customerId?: string[];
    amount?: string[];
    status?: string[];
  };
  message?: string | null;
};

export async function createInvoice(prevState: State, formData: FormData) {
  // ...
}
formData: 이전과 동일합니다.prevState:useFormState훅에서 전달된 상태를 포함합니다. 이 예제의 액션에서는 사용하지 않지만 필수 프롭입니다.
그런 다음 Zod parse() 함수를 safeParse()로 변경합니다.
1
2
3
4
5
6
7
8
9
10
11
12
// /app/lib/actions.ts

export async function createInvoice(prevState: State, formData: FormData) {
  // Validate form fields using Zod
  const validatedFields = CreateInvoice.safeParse({
    customerId: formData.get('customerId'),
    amount: formData.get('amount'),
    status: formData.get('status'),
  });

  // ...
}
safeParse()는 success 또는 error 필드가 포함된 객체를 반환합니다. 이렇게 하면 try/catch 블록 안에 이 로직을 넣지 않고도 유효성 검사를 더 우아하게 처리할 수 있습니다. 정보를 데이터베이스로 보내기 전에 조건부로 form 필드의 유효성이 올바르게 검사되었는지 확인하세요.
1
2
3
4
5
6
7
8
9
10
11
12
13
14
15
16
17
18
19
20
// /app/lib/actions.ts

export async function createInvoice(prevState: State, formData: FormData) {
  // Validate form fields using Zod
  const validatedFields = CreateInvoice.safeParse({
    customerId: formData.get('customerId'),
    amount: formData.get('amount'),
    status: formData.get('status'),
  });

  // If form validation fails, return errors early. Otherwise, continue.
  if (!validatedFields.success) {
    return {
      errors: validatedFields.error.flatten().fieldErrors,
      message: 'Missing Fields. Failed to Create Invoice.',
    };
  }

  // ...
}
validatedFields에 성공하지 못하면 Zod의 오류 메시지와 함께 함수를 조기에 반환합니다.
Tip
console.logvalidatedFields에 빈 form을 제출하여 그 모양을 확인합니다.
마지막으로 try/catch 블록 외부에서 form 유효성 검사를 별도로 처리하고 있습니다. 데이터베이스 오류에 대한 특정 메세지를 반환할 수 있도록 최종 코드는 다음과 같이 표시되어야 합니다.
1
2
3
4
5
6
7
8
9
10
11
12
13
14
15
16
17
18
19
20
21
22
23
24
25
26
27
28
29
30
31
32
33
34
35
36
37
38
39
40
// /app/lib/actions.ts

export async function createInvoice(prevState: State, formData: FormData) {
  // Validate form using Zod
  const validatedFields = CreateInvoice.safeParse({
    customerId: formData.get('customerId'),
    amount: formData.get('amount'),
    status: formData.get('status'),
  });

  // If form validation fails, return errors early. Otherwise, continue.
  if (!validatedFields.success) {
    return {
      errors: validatedFields.error.flatten().fieldErrors,
      message: 'Missing Fields. Failed to Create Invoice.',
    };
  }

  // Prepare data for insertion into the database
  const { customerId, amount, status } = validatedFields.data;
  const amountInCents = amount * 100;
  const date = new Date().toISOString().split('T')[0];

  // Insert data into the database
  try {
    await sql`
      INSERT INTO invoices (customer_id, amount, status, date)
      VALUES (${customerId}, ${amountInCents}, ${status}, ${date})
    `;
  } catch (error) {
    // If a database error occurs, return a more specific error.
    return {
      message: 'Database Error: Failed to Create Invoice.',
    };
  }

  // Revalidate the cache for the invoices page and redirect the user.
  revalidatePath('/dashboard/invoices');
  redirect('/dashboard/invoices');
}
이제 form 컴포넌트에 오류를 표시해 보겠습니다. create-form.tsx 컴포넌트로 돌아가서 form 상태를 사용하여 오류에 액세스할 수 있습니다. 각각의 특정 오류를 검사하는 삼항 연산자를 추가합니다. 예를 들어 고객 필드 귀에 다음을 추가할 수 있습니다.
1
2
3
4
5
6
7
8
9
10
11
12
13
14
15
16
17
18
19
20
21
22
23
24
25
26
27
28
29
30
31
32
33
34
35
36
37
38
39
40
// /app/ui/invoices/create-form.tsx

<form action={dispatch}>
  <div className="rounded-md bg-gray-50 p-4 md:p-6">
    {/* Customer Name */}
    <div className="mb-4">
      <label htmlFor="customer" className="mb-2 block text-sm font-medium">
        Choose customer
      </label>
      <div className="relative">
        <select
          id="customer"
          name="customerId"
          className="peer block w-full rounded-md border border-gray-200 py-2 pl-10 text-sm outline-2 placeholder:text-gray-500"
          defaultValue=""
          aria-describedby="customer-error"
        >
          <option value="" disabled>
            Select a customer
          </option>
          {customerNames.map((name) => (
            <option key={name.id} value={name.id}>
              {name.name}
            </option>
          ))}
        </select>
        <UserCircleIcon className="pointer-events-none absolute left-3 top-1/2 h-[18px] w-[18px] -translate-y-1/2 text-gray-500" />
      </div>
      <div id="customer-error" aria-live="polite" aria-atomic="true">
        {state.errors?.customerId &&
          state.errors.customerId.map((error: string) => (
            <p className="mt-2 text-sm text-red-500" key={error}>
              {error}
            </p>
          ))}
      </div>
    </div>
    // ...
  </div>
</form>
Tip
컴포넌트 내부에서 모든 것이 올바르게 연결되었는지state를 콘솔 로그로 확인할 수 있습니다. 이제 form이 클라이언트 컴포넌트이므로 개발자 도구에서 콘솔을 확인합니다.
위 코드에서는 다음 aria labels도 추가하고 있습니다.
aria-describedby="customer-error": 이렇게 하면select요소와 오류 메세지 컨테이너 간의 관계가 설정됩니다. 이는id="customer-error"를 가진 컨테이너가select요소를 설명한다는 것을 나타냅니다. 스크린 리더는 사용자가select상자와 상호 작용할 때 이 설명을 읽고 오류를 알립니다.id="customer-error": 이id속성은select입력에 대한 오류 메세지를 담고 있는 HTML 요소를 고유하게 식별합니다. 이는aria-describedby가 관계를 설정하는 데 필요합니다.aria-live="polite": 스크린 리더는div내부의 오류가 업데이트될 때 사용자에게 정중히 알려야 합니다. 콘텐츠가 변경되면(예: 사용자가 오류를 수정할 때) 스크린 리더는 변경 사항을 알리되, 사용자가 방해받지 않도록 유휴상태일 때만 알립니다.
Practice : Adding aria labels
위의 예시를 사용하여 나머지 form 필드에 오류를 추가합니다. 또한 누락된 필드가 있는 경우 form 하단에 메시지를 표시합니다. UI는 다음과 같이 표시되어야 합니다.
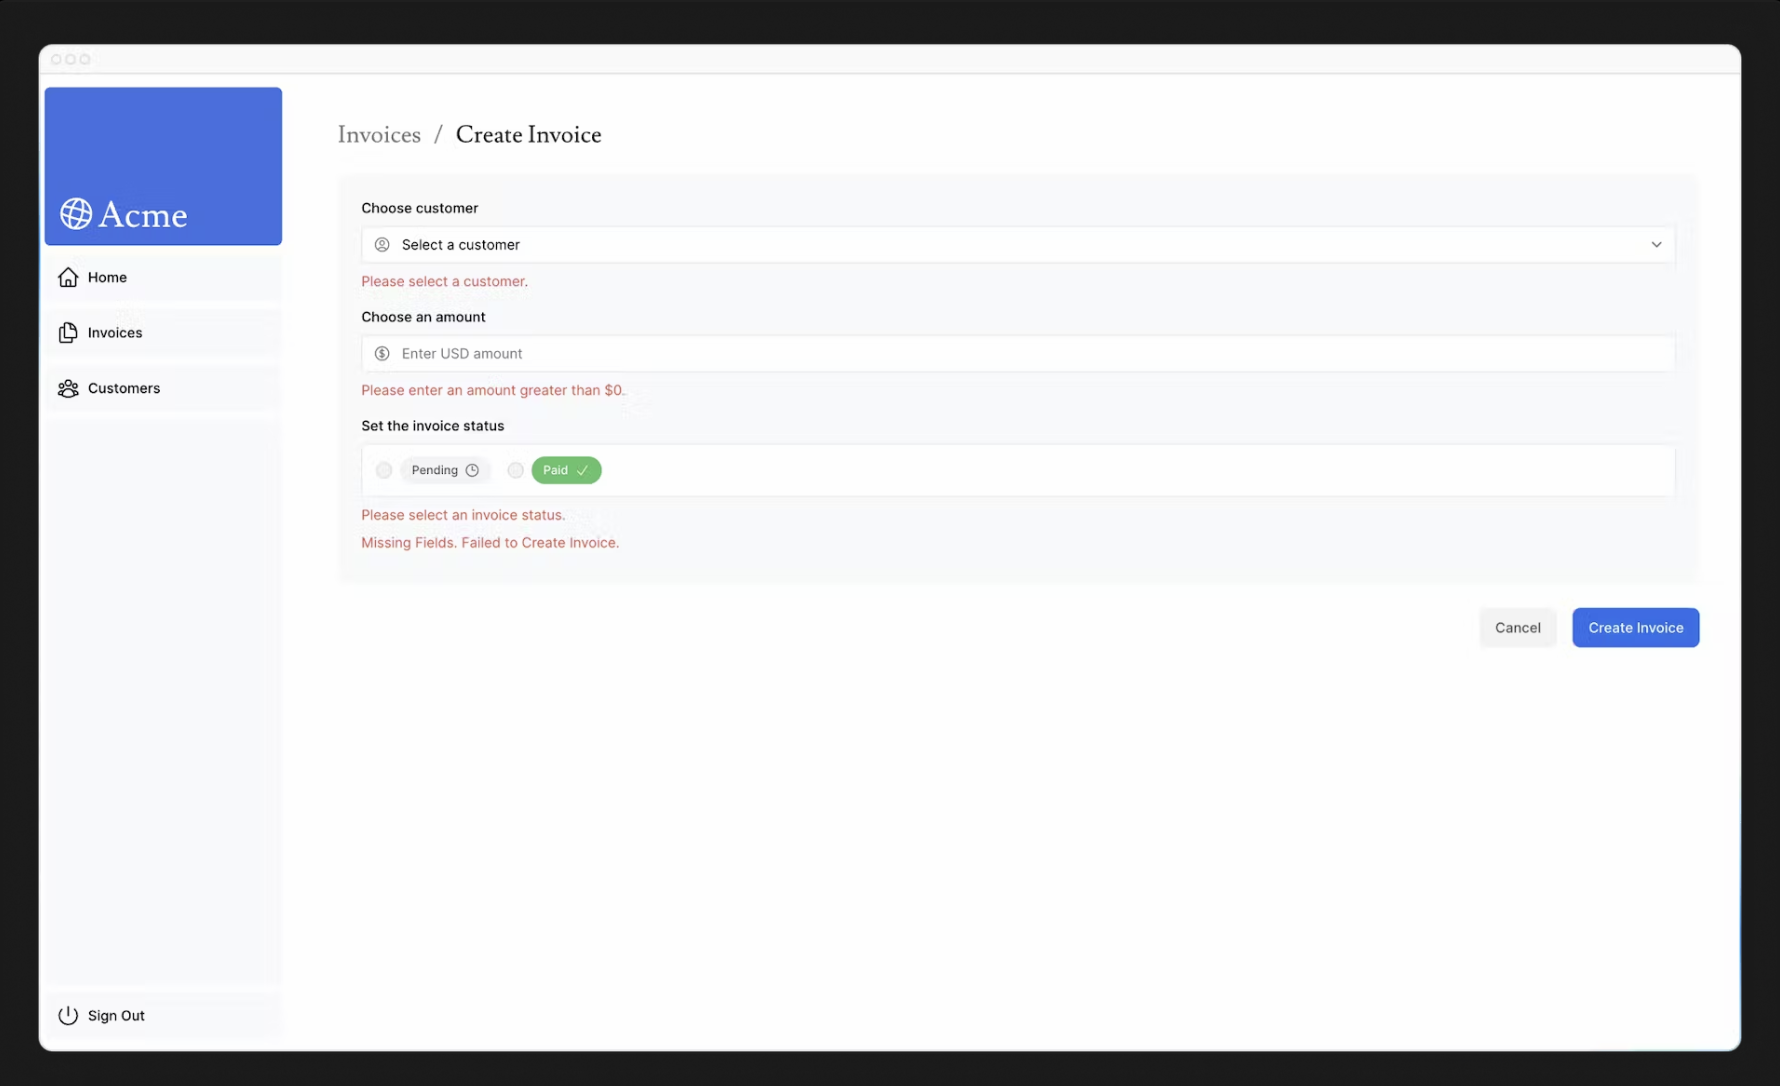
준비가 완료되면 npm run lint를 실행하여 aria labels를 올바르게 사용하고 있는지 확인합니다. 도전해보고 싶다면 이 장에서 배운 지식을 바탕으로 edit-form.tsx 컴포넌트에 form 유효성 검사를 추가해 보세요.
edit-form.tsx컴포넌트에useFromState를 추가합니다.- Zod로 유효성 검사 오류를 처리하도록
updateInvoices액션을 편집합니다. - 컴포넌트에 오류를 표시하고 접근성을 개선하기 위해 aria labels를 추가합니다.
준비가 완료되면 아래 코드를 확인하세요.
- Edit Invoice Form
1
2
3
4
5
6
7
8
9
10
11
12
13
14
15
// /app/ui/invoices/edit-form.tsx

export default function EditInvoiceForm({
  invoice,
  customers,
}: {
  invoice: InvoiceForm;
  customers: CustomerField[];
}) {
  const initialState = { message: null, errors: {} };
  const updateInvoiceWithId = updateInvoice.bind(null, invoice.id);
  const [state, dispatch] = useFormState(updateInvoiceWithId, initialState);

  return <form action={dispatch}></form>;
}
- Server Action
1
2
3
4
5
6
7
8
9
10
11
12
13
14
15
16
17
18
19
20
21
22
23
24
25
26
27
28
29
30
31
32
33
34
35
36
// /app/lib/actions.ts

export async function updateInvoice(
  id: string,
  prevState: State,
  formData: FormData,
) {
  const validatedFields = UpdateInvoice.safeParse({
    customerId: formData.get('customerId'),
    amount: formData.get('amount'),
    status: formData.get('status'),
  });

  if (!validatedFields.success) {
    return {
      errors: validatedFields.error.flatten().fieldErrors,
      message: 'Missing Fields. Failed to Update Invoice.',
    };
  }

  const { customerId, amount, status } = validatedFields.data;
  const amountInCents = amount * 100;

  try {
    await sql`
      UPDATE invoices
      SET customer_id = ${customerId}, amount = ${amountInCents}, status = ${status}
      WHERE id = ${id}
    `;
  } catch (error) {
    return { message: 'Database Error: Failed to Update Invoice.' };
  }

  revalidatePath('/dashboard/invoices');
  redirect('/dashboard/invoices');
}