Next.js Learn - 7. Fetching Data 번역

본 포스팅은 Next.js Learn의 Fetching Data 내용을 번역한 것입니다.
이제 데이터베이스를 만들고 시드를 지정했으므로 애플리케이션에 데이터를 가져올 수 있는 다양한 방법에 대해 논의하고 대시보드 개요 페이지를 구축해 보겠습니다.
In this chapter
앞으로 다룰 주제는 다음과 같습니다.
- 데이터를 가져오는 몇 가지 방법 : API, ORM, SQL 등
- Server Component를 통해 백엔드 리소스를 가져오는 방법
- Network waterfall이란 무엇인가요?
- JavaScript 패턴을 사용하여 병렬 데이터를 가져오는 방법
Choosing how to fetch data
API layer
API는 애플리케이션 코드와 데이터베이스 사이의 중간 계층입니다. API를 사용할 수 있는 몇 가지 경우가 있습니다.
- API를 제공하는 타사 서비스를 사용하는 경우
- 데이터베이스 비밀이 클라이언트에 노출되지 않도록하는 경우
Next.js에서는 Route Handlers를 사용하여 API 엔드포인트를 만들 수 있습니다.
Database queries
풀스택 애플리케이션을 만들때는 데이터베이스와 상호작용하는 로직을 작성해야 합니다. Postgres와 같은 관계형 데이터베이스의 경우 SQL 또는 ORM을 사용하여 이 작업을 수행할 수 있습니다.
데이터베이스 쿼리를 작성해야하는 경우가 몇 가지 있습니다.
- API 엔드포인트를 만들때 데이터베이스와 상호작용하는 로직을 작성해야하는 경우
- React Server Component를 사용해 서버에서 데이터베이스와 상호작용하는 로직을 작성해야하는 경우
React Server Component를 사용하면 API 계층을 건너뛰고 데이터베이스 비밀을 클라이언트에 노출할 위험 없이 직접 데이터베이스를 쿼리할 수 있습니다. React Server Component에 대해 자세히 알아보겠습니다.
Using Server Components to fetch data
Next.js 애플리케이션은 기본적으로 React Server Component를 사용합니다. Server Component로 데이터를 가져오는 것은 비교적 새로운 접근 방식이며, 이를 사용하면 몇 가지 이점이 있습니다.
- Sever Component는 Promise를 지원하므로 데이터 불러오기와 같은 비동기 작업을 위한 간단한 솔루션을 제공합니다.
useEffect,useState또는axios를 사용하지 않고도async/await구문을 사용할 수 있습니다. - Server Component는 서버에서 실행되므로 비용이 많이 드는 데이터 가져오기 로직을 서버에 남겨두고 결과만 클라이언트로 전송할 수 있습니다.
- 앞서 언급했듯이 Server Component는 서버에서 실행되므로 추가 API 계층 없이 데이터베이스를 직접 쿼리할 수 있습니다.
Using SQL
대시보드 프로젝트의 경우 Vercel Postgres SDK와 SQL을 사용하여 데이터베이스 쿼리를 작성하게 됩니다. SQL을 사용하는 데에는 몇 가지 이유가 있습니다.
- SQL은 관계형 데이터베이스를 쿼리하기 위한 업계 표준입니다. ORM은 내부에서 SQL을 생성합니다.
- SQL은 다재다능하여 특정 데이터를 가져오고 조작할 수 있습니다.
- Vercel Postgres SDK는 SQL injections에 대한 보호 기능을 제공합니다.
SQL을 사용해 본 적이 없더라도 걱정하지 마세요. 쿼리를 제공해 드립니다. app/lib/data.ts로 이동하면 @vercel/postgres에서 sql 함수를 가져오는 것을 볼 수 있습니다. 이 함수를 사용하면 데이터베이스를 쿼리할 수 있습니다.
1
2
3
4
5
// /app/lib/data.ts

import { sql } from '@vercel/postgres';

// ...
모든 Server Component 내에서 sql을 호출할 수 있습니다. 하지만 컴포넌트를 더 쉽게 탐색할 수 있도록 모든 데이터 쿼리를 data.ts 파일에 보관하고 있으며, 이를 컴포넌트로 가져올 수 있습니다.
Note : Chapter 6에서 자체 데이터베이스 제공업체를 사용한 경우 데이터베이스 쿼리를 업데이트해야 합니다. 쿼리는
/app/lib/data.ts에서 찾을 수 있습니다.
Fetching data for the dashboard overview page
이제 데이터를 가져오는 다양한 방법을 이해했으므로 대시보드 개요 페이지에 대한 데이터를 가져와 보겠습니다. app/dashboard/page.tsx로 이동하여 다음 코드를 붙여넣고 잠시 살펴봅니다.
1
2
3
4
5
6
7
8
9
10
11
12
13
14
15
16
17
18
19
20
21
22
23
24
25
26
27
28
29
30
// /app/dashboard/page.tsx

import { Card } from '@/app/ui/dashboard/cards';
import RevenueChart from '@/app/ui/dashboard/revenue-chart';
import LatestInvoices from '@/app/ui/dashboard/latest-invoices';
import { lusitana } from '@/app/ui/fonts';

export default async function Page() {
  return (
    <main>
      <h1 className={`${lusitana.className} mb-4 text-xl md:text-2xl`}>
        Dashboard
      </h1>
      <div className="grid gap-6 sm:grid-cols-2 lg:grid-cols-4">
        {/* <Card title="Collected" value={totalPaidInvoices} type="collected" /> */}
        {/* <Card title="Pending" value={totalPendingInvoices} type="pending" /> */}
        {/* <Card title="Total Invoices" value={numberOfInvoices} type="invoices" /> */}
        {/* <Card
          title="Total Customers"
          value={numberOfCustomers}
          type="customers"
        /> */}
      </div>
      <div className="mt-6 grid grid-cols-1 gap-6 md:grid-cols-4 lg:grid-cols-8">
        {/* <RevenueChart revenue={revenue}  /> */}
        {/* <LatestInvoices latestInvoices={latestInvoices} /> */}
      </div>
    </main>
  );
}
위의 코드에서
- Page는 비동기 컴포넌트입니다. 따라서
await를 사용하여 데이터를 가져올 수 있습니다. - 데이터를 수신하는 컴포넌트도
<Card />,<RevenueChart />,<LatestInvoices />3개가 있습니다. 이 컴포넌트들은 현재 애플리케이션의 오류를 방지하기 위해 주석 처리 되어있습니다.
Fetching data for <RevenueChart />
<RevenueChart /> 컴포넌트의 데이터를 가져오려면 data.ts에서 fetchRevenue 함수를 가져와서 컴포넌트 내에서 호출합니다.
1
2
3
4
5
6
7
8
9
10
11
12
// /app/dashboard/page.tsx

import { Card } from '@/app/ui/dashboard/cards';
import RevenueChart from '@/app/ui/dashboard/revenue-chart';
import LatestInvoices from '@/app/ui/dashboard/latest-invoices';
import { lusitana } from '@/app/ui/fonts';
import { fetchRevenue } from '@/app/lib/data';

export default async function Page() {
  const revenue = await fetchRevenue();
  // ...
}
그런 다음 <RevenueChart /> 컴포넌트의 주석 처리를 제거하고 컴포넌트 파일(app/ui/dashboard/revenue-chart.tsx)로 이동하여 그 안에 있는 코드의 주석 처리를 제거합니다. 로컬 호스트를 확인하면 수익 데이터를 사용하는 차트를 볼 수 있습니다.
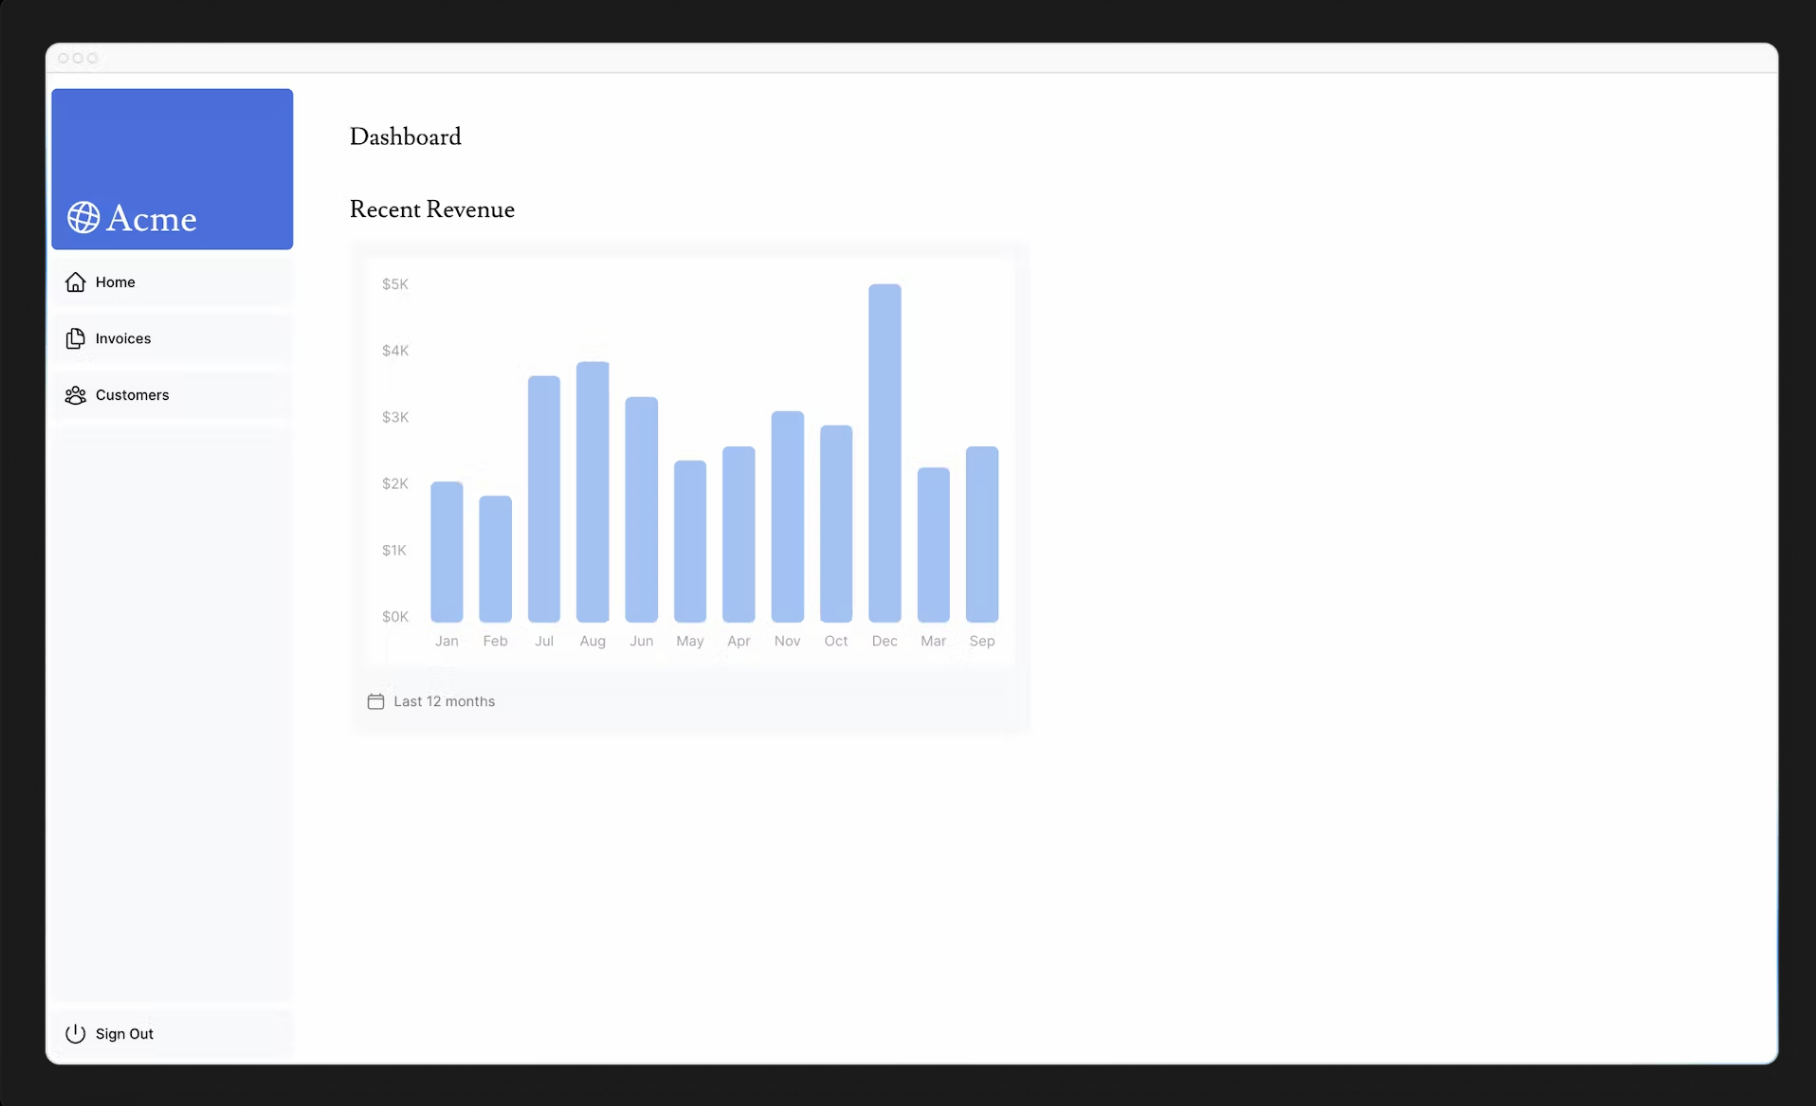 출처 : Next.js Learn
Fetching data for <LatestInvoices />
<LatestInvoices /> 구성 요소의 경우 날짜별로 정렬된 최선 invoices 5개를 가져와야 합니다.
모든 invoices를 가져와서 JavaScript를 사용하여 정렬할 수 있습니다. 데이터가 작기 때문에 문제가 되지 않지만 애플리케이션이 커지면 각 요청에서 전송되는 데이터의 양과 이를 정렬하는데 필요한 JavaScript의 양이 크게 증가할 수 있습니다.
최신 invoices를 인메모리에서 정렬하는 대신 SQL 쿼리를 사용하여 최근 5개의 인보이스만 가져올 수 있습니다. 예를 들어 다음은 data.ts 파일의 SQL 쿼리입니다.
1
2
3
4
5
6
7
8
9
// /app/lib/data.ts

// Fetch the last 5 invoices, sorted by date
const data = await sql<LatestInvoiceRaw>`
  SELECT invoices.amount, customers.name, customers.image_url, customers.email
  FROM invoices
  JOIN customers ON invoices.customer_id = customers.id
  ORDER BY invoices.date DESC
  LIMIT 5`;
페이지에서 fetchLatestInvoices 함수를 가져옵니다.
1
2
3
4
5
6
7
8
9
10
11
12
13
// /app/dashboard/page.tsx

import { Card } from '@/app/ui/dashboard/cards';
import RevenueChart from '@/app/ui/dashboard/revenue-chart';
import LatestInvoices from '@/app/ui/dashboard/latest-invoices';
import { lusitana } from '@/app/ui/fonts';
import { fetchRevenue, fetchLatestInvoices } from '@/app/lib/data';

export default async function Page() {
  const revenue = await fetchRevenue();
  const latestInvoices = await fetchLatestInvoices();
  // ...
}
그런 다음 <LatestInvoices /> 구성 요소의 주석 처리를 제거합니다. 또한 app/ui/dashboard/latest-invoices에 있는 <LatestInvoices /> 구성 요소 자체에서 관련 코드의 주석 처리를 제거합니다. 로컬 호스트를 방문하면 데이터베이스에서 최근 5개만 반환되는 것을 확인할 수 있습니다. 이제 데이터베이스를 직접 쿼리하는 것의 장점을 아셨길 바랍니다.
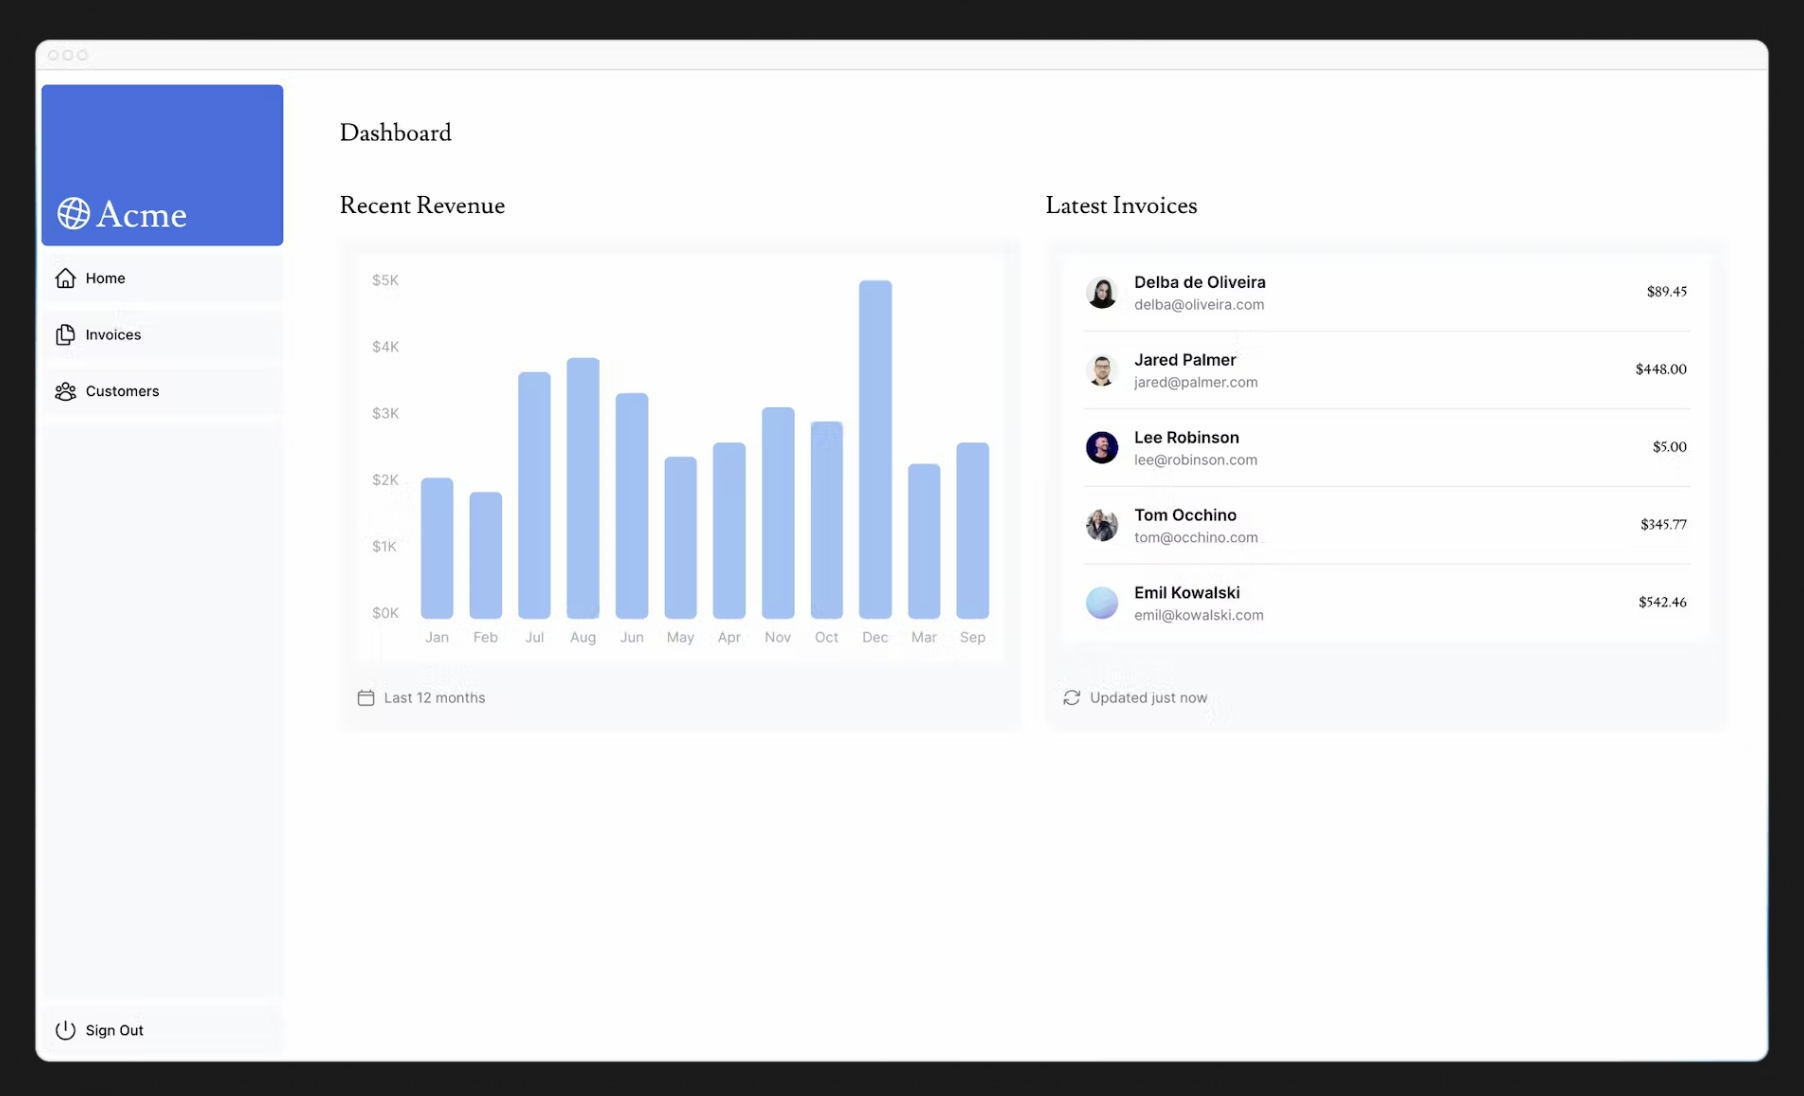 출처 : Next.js Learn
Practice : Fetch data for the <Card /> components
이제 <Card /> 구성 요소에 대한 데이터를 가져올 차례입니다. 카드에 다음 데이터가 표시됩니다.
- Total amount of invoices collected
- Total amount of invoices pending
- Total number of invoices
- Total number of customers
다시 말하지만 모든 송장과 고객을 가져와서 JavaScript를 사용하여 데이터를 조작하고 싶을 수 있습니다. 예를 들어 Array.length를 사용하여 총 송장 및 고객 수를 가져올 수 있습니다.
1
2
const totalInvoices = allInvoices.length;
const totalCustomers = allCustomers.length;
하지만 SQL을 사용하면 필요한 데이터만 가져올 수 있습니다. Array.length를 사용하는 것보다 조금 더 오래 걸리지만 요청 중에 전송해야 하는 데이터가 적다는 뜻입니다. 이것이 SQL을 사용하는 이유입니다.
1
2
3
4
// /app/lib/data.ts

const invoiceCountPromise = sql`SELECT COUNT(*) FROM invoices`;
const customerCountPromise = sql`SELECT COUNT(*) FROM customers`;
가져와야 하는 함수의 이름은 fetchCardData입니다. 함수에서 반환된 값을 구조분해할당해야 합니다.
Hint
- 카드 구성 요소를 확인하여 필요한 데이터를 확인합니다.
data.ts파일을 확인하여 함수가 반환하는 내용을 확인합니다.
준비가 완료되면 아래의 토글을 펼쳐서 최종 코드를 확입합니다.
- Reveal the solution
1
2
3
4
5
6
7
8
9
10
11
12
13
14
15
16
17
18
19
20
21
22
23
24
25
26
27
28
29
30
31
32
33
34
35
36
37
38
39
40
41
42
43
44
// /app/dashboard/page.tsx

import { Card } from '@/app/ui/dashboard/cards';
import RevenueChart from '@/app/ui/dashboard/revenue-chart';
import LatestInvoices from '@/app/ui/dashboard/latest-invoices';
import { lusitana } from '@/app/ui/fonts';
import {
  fetchRevenue,
  fetchLatestInvoices,
  fetchCardData,
} from '@/app/lib/data';

export default async function Page() {
  const revenue = await fetchRevenue();
  const latestInvoices = await fetchLatestInvoices();
  const {
    numberOfInvoices,
    numberOfCustomers,
    totalPaidInvoices,
    totalPendingInvoices,
  } = await fetchCardData();

  return (
    <main>
      <h1 className={`${lusitana.className} mb-4 text-xl md:text-2xl`}>
        Dashboard
      </h1>
      <div className="grid gap-6 sm:grid-cols-2 lg:grid-cols-4">
        <Card title="Collected" value={totalPaidInvoices} type="collected" />
        <Card title="Pending" value={totalPendingInvoices} type="pending" />
        <Card title="Total Invoices" value={numberOfInvoices} type="invoices" />
        <Card
          title="Total Customers"
          value={numberOfCustomers}
          type="customers"
        />
      </div>
      <div className="mt-6 grid grid-cols-1 gap-6 md:grid-cols-4 lg:grid-cols-8">
        <RevenueChart revenue={revenue} />
        <LatestInvoices latestInvoices={latestInvoices} />
      </div>
    </main>
  );
}
훌륭합니다. 이제 대시보드 개요 페이지에 대한 모든 데이터를 가져왔습니다. 페이지가 다음과 같이 표시되어야 합니다.
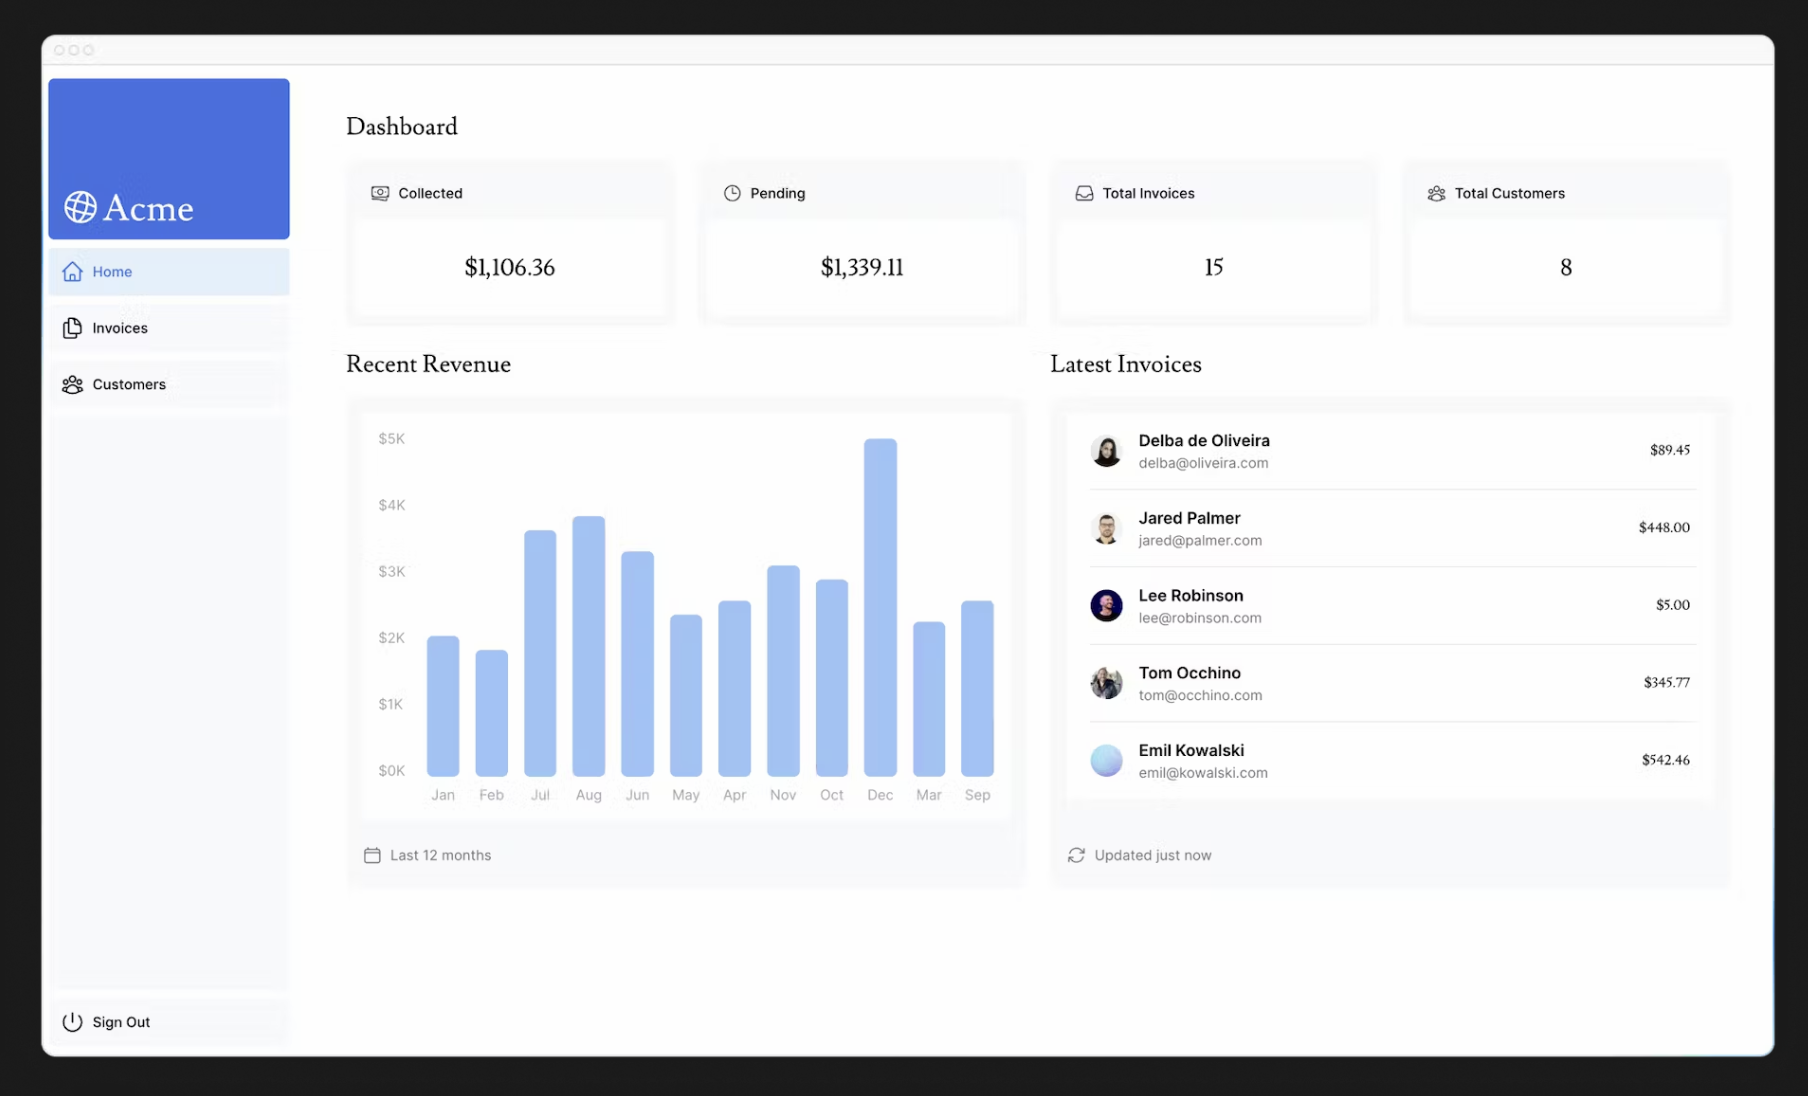 출처 : Next.js Learn
하지만 두 가지 주의해야할 점이 있습니다.
- 데이터 요청이 의도치 않게 서로를 차단하여 request waterfall을 생성한다는 것입니다.
- Next.js는 기본적으로 성능을 개선하기 위해 경로를 미리 렌더링하는데, 이를 정적 렌더링이라고 합니다. 따라서 데이터가 변경되면 대시보드에 반영되지 않습니다.
이번 장에서는 첫번째 내용을 살펴보고, 다음 장에서 두번째 내용을 자세히 살펴보겠습니다.
What are request waterfalls?
“waterfall”은 이전 요청의 완료 여부에 따라 달라지는 일련의 네트워크 요청을 의미합니다. 데이터 가져오기의 경우 각 요청은 이전 요청이 데이터를 반환한 후에만 시작할 수 있습니다.
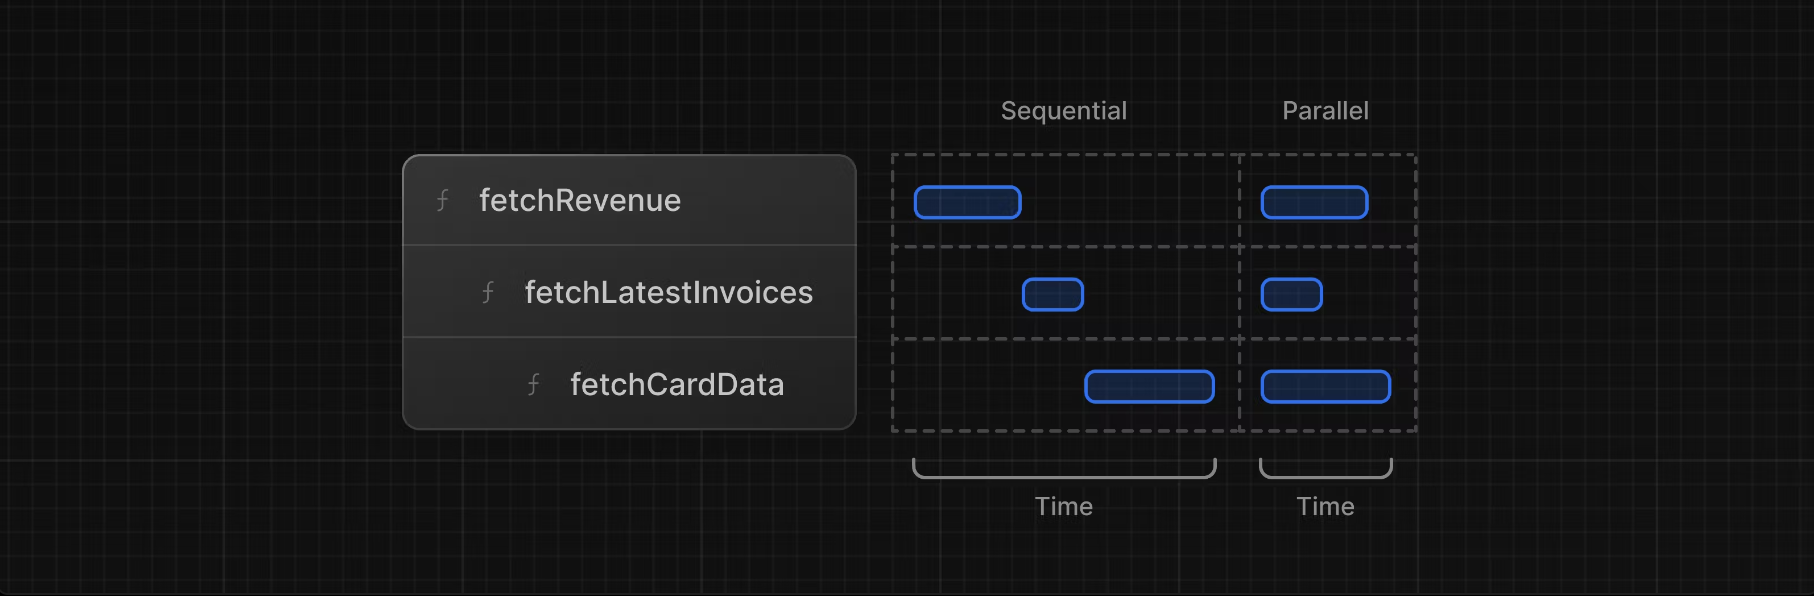 출처 : Next.js Learn
예를 들어 fetchLatestInvoices()는 fetchRevenue()가 요청과 응답을 완료할때까지 기다려합니다.
1
2
3
4
5
6
7
8
9
10
// /app/dashboard/page.tsx

const revenue = await fetchRevenue();
const latestInvoices = await fetchLatestInvoices(); // wait for fetchRevenue() to finish
const {
  numberOfInvoices,
  numberOfCustomers,
  totalPaidInvoices,
  totalPendingInvoices,
} = await fetchCardData(); // wait for fetchLatestInvoices() to finish
이 패턴이 반드시 나쁜 것은 아닙니다. 다음 요청을 하기 전에 조건이 충족되기를 원하기 때문에 waterfall이 필요한 경우가 있을 수 있습니다. 예를 들어 사용자의 ID를 먼저 가져오고 싶을 수 있습니다. ID를 확보한 다음에는 해당 사용자의 친구 목록을 가져올 수 있습니다. 이 경우 각 요청은 이전 요청에서 반환된 데이터에 따라 조건부로 이루어집니다. 그러나 이 동작은 의도치 않게 성능에 영향을 줄 수 있습니다.
Parallel data fetching
waterfall을 방지하는 일반적인 방법은 모든 데이터 요청을 동시에 병렬로 시작하는 것입니다. JavaScript에서는 Promise.all() 또는 Promise.allSettled() 함수를 사용하여 모든 Promise를 동시에 시작할 수 있습니다. 예를 들어 data.ts에서는 fetchCardData() 함수에서 Promise.all()을 사용하고 있습니다.
1
2
3
4
5
6
7
8
9
10
11
12
13
14
15
16
17
18
19
// /app/lib/data.js

export async function fetchCardData() {
  try {
    const invoiceCountPromise = sql`SELECT COUNT(*) FROM invoices`;
    const customerCountPromise = sql`SELECT COUNT(*) FROM customers`;
    const invoiceStatusPromise = sql`SELECT
         SUM(CASE WHEN status = 'paid' THEN amount ELSE 0 END) AS "paid",
         SUM(CASE WHEN status = 'pending' THEN amount ELSE 0 END) AS "pending"
         FROM invoices`;

    const data = await Promise.all([
      invoiceCountPromise,
      customerCountPromise,
      invoiceStatusPromise,
    ]);
    // ...
  }
}
이 패턴을 사용하면 다음을 기대할 수 있습니다.
- 모든 데이터 가져오기를 동시에 실행하여 성능을 향상시킬 수 있습니다.
- 모든 라이브러리나 프레임워크에 적용할 수 있는 네이티브 JavaScript 패턴을 사용합니다.
그러나 이 JavaScript 패턴에만 의존할 경우 한 가지 단점이 있습니다. 하나의 데이터 요청이 다른 모든 데이터 요청보다 느리면 어떻게 될까요?